
Buckle up as we embark on an adventure through serverless NodeJS and Go.
Our main project will be a serverless architecture featuring API Gateway, Lambdas, DynamoDB, SNS, and SQS. We’ll work with Terraform, our infrastructure-as-code tool, and use GitHub Actions for our continuous integration and deployment, where we’ll deploy our infrastructure and lambda apps with a simple push to the main branch.
We’ll organize our HTTP methods, configure the AWS provider in Terraform, and even set up an S3 bucket for storing our precious Terraform state.
Our first task? Building a Lambda to fetch a movie by its ID. We’ll create modular and reusable Terraform code, deploy it using GitHub Actions, write a Lambda using NodeJS, and link it to DynamoDB.
Let the adventure begin!
Requirements:
- An AWS account
- Any code editor of your choice — I use Visual Studio Code
- NodeJS
- GitHub account — We’ll use GitHub Actions to deploy our Terraform code
Regarding AWS costs: Everything we’ll be using is free or has a very low cost that will not be charged unless you add a very high usage. If you are afraid about having unknown charges, you can set up a $0.01 budget to alert you if you are being charged for anything.
The Project
We will build an entire serverless architecture.
- API Gateway — This is where the endpoints will be mapped and exposed.
- Lambdas — They will handle API Gateway events and the SQS events.
- DynamoDB — It will be our database.
- SQS — Our message queue, where the email notification lambda will be notified whenever a movie is created, deleted, or updated.
- SNS — Notification services to send events to SQS for a fanout pattern
- SES — AWS Simple Email System to manage and send emails from AWS.
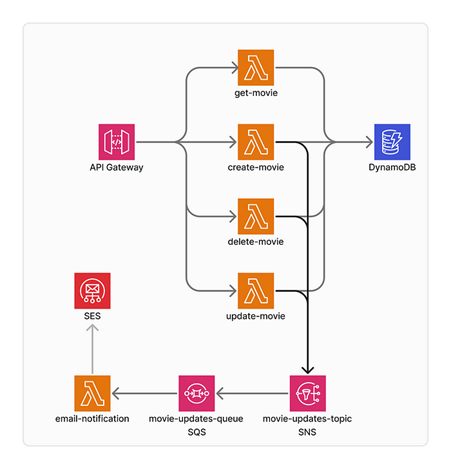
Fig. 1
We’ll also be using:
- Terraform — Our infrastructure as a code that will create and manage our whole AWS infrastructure.
- GitHub Actions — Our CI/CD, which will build and deploy our infrastructure and our lambdas.
Why serverless? Serverless computing is a cloud computing model where you don’t have to provision or manage servers. Instead, the cloud provider automatically manages the infrastructure, allowing developers to focus solely on writing code and deploying applications. The term “serverless” doesn’t mean no servers are involved. It means you don’t have to worry about the underlying server infrastructure.
Some of the benefits of serverless are:
- Cost Savings — You only pay for the computing resources your code consumes.
- Scalability — Serverless platforms automatically scale your applications based on demand without manual intervention.
- Zero Idle Capacity — Your resources are only allocated when needed, so you won’t have provisioned resources without being used.
Let’s begin our project. We are adding our first lambda to get a movie by its ID.
Lambda module
Create a folder for your project, and inside it, create a folder named iac. This is where we’ll be adding all our infrastructure as a code. Now create a new folder inside it named modules. Here, we’ll be adding our reusable terraform modules. And now, add a folder lambda for our Lambda function module. Inside the lambda folder, create three files, main.tf, datasources.tf and variables.tf .
- main.tf — will hold the main code for our module. Resources declaration, other modules usage, etc.
- datasources.tf — will hold any data that might need to be generated, transformed, or imported.
- variables.tf — It defines all the input variables for our module.
For the main.tf file, add the following code:
resource "aws_iam_role" "iam_for_lambda" {
 name               = "${var.name}-lambda-role"
 assume_role_policy = data.aws_iam_policy_document.assume_role.json
}

resource "aws_lambda_function" "lambda" {
 filename      = data.archive_file.lambda.output_path
 function_name = var.name
 role          = aws_iam_role.iam_for_lambda.arn
 handler       = var.handler
 runtime       = "nodejs20.x"
}
We also declare a role, which all lambda functions need, and the lambda code itself in aws_lambda_function. Note the keywords data and var. The first is for data from the data sources, and the second is for anything passed to the module through variables.
Now for the variables.tf:
variable "name" {
 description = "The name of the Lambda function"
 type        = string
 nullable    = false
}

variable "handler" {
 description = "The handler function in your code for he Lambda function"
 type        = string
 default     = "index.handler"
}
And for the datasources.tf :
locals {
 filename = strcontains(var.runtime, "node") ? "index.mjs" : "main"
}

data "archive_file" "lambda" {
 type        = "zip"
 source_file = "./modules/lambda/init_code/${local.filename}"
 output_path = "${var.name}_lambda_function_payload.zip"
}

data "aws_iam_policy_document" "assume_role" {
 statement {
   effect = "Allow"

   principals {
     type        = "Service"
     identifiers = ["lambda.amazonaws.com"]
   }

   actions = ["sts:AssumeRole"]
 }
}
Here, we define the IAM policy for the lambda role and the file that will be added to the lambda. This file is required for our Terraform code, even if you are doing deployment in a different flow, which you will be doing. This is also seen in the filename local variable, where we assign the file depending on the lambda runtime. So, let’s add our seed code.
If you’d like to enable logging to CloudWatch, you can add this policy document:
data "aws_iam_policy_document" "lambda_logging" {
 statement {
   effect = "Allow"

   actions = [
     "logs:CreateLogGroup",
     "logs:CreateLogStream",
     "logs:PutLogEvents",
   ]

   resources = ["arn:aws:logs:*:*:*"]
 }
}
And then, in the main.tf , add the policy attachment:
resource "aws_iam_policy" "lambda_logging" {
 name        = "lambda_logging_${aws_lambda_function.lambda.function_name}"
 path        = "/"
 description = "IAM policy for logging from a lambda"
 policy      = data.aws_iam_policy_document.lambda_logging.json
}

resource "aws_iam_role_policy_attachment" "lambda_logs" {
 role       = aws_iam_role.iam_for_lambda.name
 policy_arn = aws_iam_policy.lambda_logging.arn
}
Create a folder named init_code under the lambda module folder. For the Node.js seed code, you can create a new file index.mjs and add the following code:
// Default handler generated in AWS
export const handler = async (event) => {
 const response = {
   statusCode: 200,
   body: JSON.stringify('Hello from Lambda!'),
 };
 return response;
};
Note that it needs to be mjs file, because we are not adding a project.json file to define the module. The file needs to be with this extension so Node.js will handle the code as ECMAScript modules.
Adding the main infra code
In the iac folder, create a lambdas.tf file with the following code:
module "get_movie_lambda" {
 source        = "./modules/lambda"
 name          = "get-movie"
 runtime       = "nodejs20.x"
 handler       = "index.handler"
}
We also need to configure Terraform to use AWS as its provider. Create a provider.tf file with the following code:
terraform {
 required_providers {
   aws = {
     source  = "hashicorp/aws"
     version = "~> 5.0"
   }
 }
}

# Configure the AWS Provider
provider "aws" {
 region = var.region
}
And now, create two files, variables.tf to declare the default variables of our IaC:
variable "region" {
 description = "Default region of your resources"
 type        = string
 default     = "eu-central-1"
}
And for variables.tfvars to pass variable values that are not secret, but we might want to change depending on the deployment configuration:
region="eu-central-1" // Chage here to your region here
If you’d like Terraform to keep track of the changes to update the components, you need to add where it will save and manage the state. Here, we’ll be using an S3 bucket for that. Create an S3 bucket with the name terraform-medium-api-notification and modify the provider.tf file with the following code:
terraform {
 required_providers {
   aws = {
     source  = "hashicorp/aws"
     version = "~> 5.0"
   }
 }

 backend "s3" {
   bucket = "terraform-medium-api-notification"
   key    = "state"
   region = "eu-central-1" // Chage here to your region here
 }
}

# Configure the AWS Provider
provider "aws" {
 region = var.region
}
Note that you can choose the region that you are nearest to instead of eu-central-1. I just chose it because it is the closest to me. We are ready to build the workflow to deploy our infrastructure to AWS.
Deploying the infrastructure
To deploy our infrastructure, we’ll be using Github Actions. The CI solutions in GitHub allow us to run scripts in our code when we change it. If you’d like to know more about it, check the documentation here.
To perform this step, you’ll need to generate an AWS Access Key and Secret for a user that has the rights to create the resources you define in AWS. Add these secrets to your repository action secrets in your in Settings:
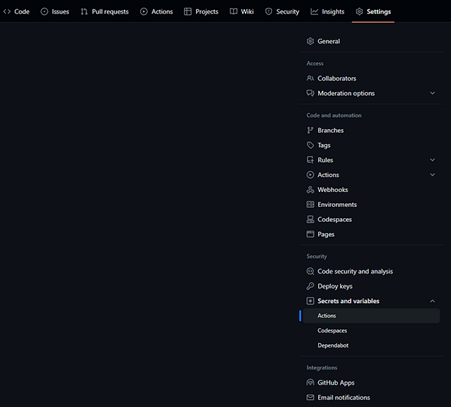
Fig. 2
Now, in the root folder, let’s create a .github folder and a workflows folder inside of it. Create a file named deploy-infrastructure.yml and add the following code:
name: Deploy Infrastructure
on:
 push:
   branches:
     - main
   paths:
     - iac/**/*
     - .github/workflows/deploy-infra.yml

defaults:
 run:
   working-directory: iac/

jobs:
 terraform:
   name: "Terraform"
   runs-on: ubuntu-latest
   steps:
     # Checkout the repository to the GitHub Actions runner
     - name: Checkout
       uses: actions/checkout@v3

     - name: Configure AWS Credentials Action For GitHub Actions
       uses: aws-actions/configure-aws-credentials@v1
       with:
         aws-access-key-id: ${{ secrets.AWS_ACCESS_KEY }}
         aws-secret-access-key: ${{ secrets.AWS_SECRET_ACCESS_KEY }}
         aws-region: eu-central-1 # Use your preferred region

     # Install the latest version of Terraform CLI and configure the Terraform CLI configuration file with a Terraform Cloud user API token
     - name: Setup Terraform
       uses: hashicorp/setup-terraform@v3

     # Initialize a new or existing Terraform working directory by creating initial files, loading any remote state, downloading modules, etc.
     - name: Terraform Init
       run: terraform init

     # Checks that all Terraform configuration files adhere to a canonical format
     - name: Terraform Format
       run: terraform fmt -check

     # Generates an execution plan for Terraform
     - name: Terraform Plan
       run: terraform plan -out=plan -input=false -var-file="variables.tfvars"

       # On push to "main", build or change infrastructure according to Terraform configuration files
       # Note: It is recommended to set up a required "strict" status check in your repository for "Terraform Cloud". See the documentation on "strict" required status checks for more information: https://help.github.com/en/github/administering-a-repository/types-of-required-status-checks
     - name: Terraform Apply
       run: terraform apply -auto-approve -input=false plan
Every time you push a change to a file inside the iac folder, it will trigger this action, and will automatically generate the resources in AWS for you:
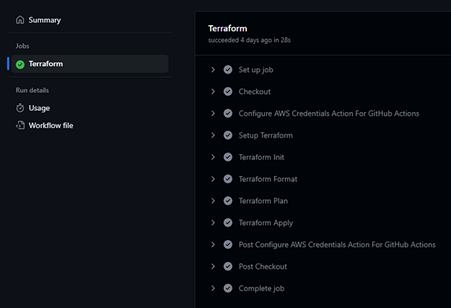
Fig. 3
Note that in the Terraform Plan step, terraform outputs all the changes it will perform in AWS based on the current state in the S3 bucket. Now you can go to AWS on the Lambda page and see your recently created function:
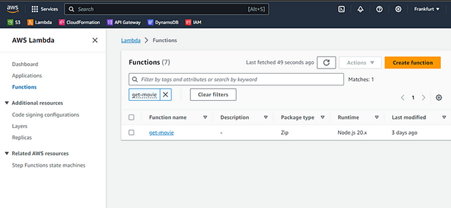
Fig. 4
To test it, click on it and then on the Test tab.

Fig. 5
There, you can give a name to the test event that will be sent to the Lambda and then click on the Test button.
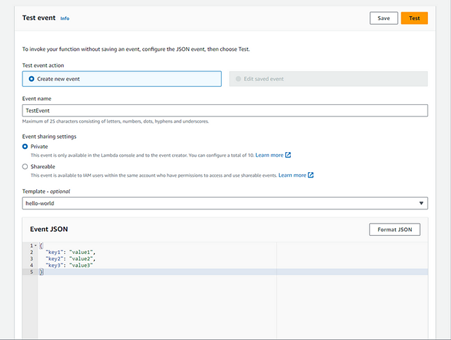
Fig. 6
You should see a success notification with the return from the lambda:
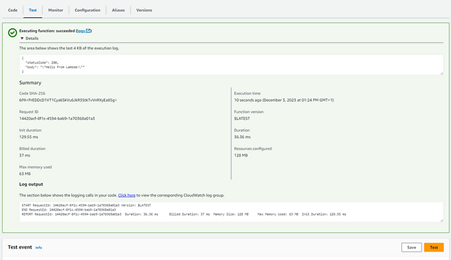
Fig. 7
Now, let’s add a GET endpoint through API Gateway so we can call our lambda through HTTP requests. Let’s first create a module for our HTTP methods. Under the folder modules, create a folder rest-api-method. Then, create three files: main.tf, variables.tf, and outputs.tf.
For the variables.tf, add the following code:
variable "http_method" {
 description = "The HTTP method"
 type        = string
}

variable "resource_id" {
 description = "The ID of the resource this method is attached to"
 type        = string
}

variable "api_id" {
 description = "The ID of the API this method is attached to"
 type        = string
}

variable "integration_uri" {
 description = "The URI of the integration this method will call"
 type        = string
}

variable "resource_path" {
 description = "The path of the resource"
 type        = string
}

variable "lambda_function_name" {
 description = "The name of the Lambda function that will be called"
 type        = string
}

variable "region" {
 description = "The region of the REST API resources"
 type        = string
}

variable "account_id" {
 description = "The ID of the AWS account"
 type        = string
}
For the outputs.tf:
output "id" {
 value = aws_api_gateway_method.method.id
}

output "integration_id" {
 value = aws_api_gateway_integration.integration.id
}
Now for the main.tf :
resource "aws_api_gateway_method" "method" {
 authorization = "NONE"
 http_method   = var.http_method
 resource_id   = var.resource_id
 rest_api_id   = var.api_id
}

resource "aws_api_gateway_integration" "integration" {
 http_method             = aws_api_gateway_method.method.http_method
 integration_http_method = "POST" # Lambda functions can only be invoked via POST
 resource_id             = var.resource_id
 rest_api_id             = var.api_id
 type                    = "AWS_PROXY"
 uri                     = var.integration_uri
}

resource "aws_lambda_permission" "apigw_lambda" {
 statement_id  = "AllowExecutionFromAPIGateway"
 action        = "lambda:InvokeFunction"
 function_name = var.lambda_function_name
 principal     = "apigateway.amazonaws.com"
 source_arn    = "arn:aws:execute-api:${var.region}:${var.account_if}:${var.api_id}/*/${aws_api_gateway_method.method.http_method}${var.resource_path}"
}
This will generate an HTTP method attached to your API and use lambda proxy integration. We want our Lambda to be responsible for the HTTP behavior of the request and response. So, only the API Gateway will pass it through.
Now, in the root iac folder, create a rest-api.tf file and add the following code:
# API Gateway
resource "aws_api_gateway_rest_api" "movies_api" {
 name = "movies-api"
}

resource "aws_api_gateway_deployment" "movies_api_deployment" {
 rest_api_id = aws_api_gateway_rest_api.movies_api.id
 stage_name  = aws_api_gateway_stage.live.stage_name

 triggers = {
   redeployment = sha1(jsonencode([
     aws_api_gateway_resource.movies_root_resource.id,
     module.get_movie_method.id,
     module.get_movie_method.integration_id,
   ]))
 }

 lifecycle {
   create_before_destroy = true
 }
}

resource "aws_api_gateway_stage" "live" {
 deployment_id = aws_api_gateway_deployment.movies_api_deployment.id
 rest_api_id   = aws_api_gateway_rest_api.movies_api.id
 stage_name    = "live"
}

resource "aws_api_gateway_resource" "movies_root_resource" {
 parent_id   = aws_api_gateway_rest_api.movies_api.root_resource_id
 path_part   = "movies"
 rest_api_id = aws_api_gateway_rest_api.movies_api.id
}

module "get_movie_method" {
 source               = "./modules/rest-api-method"
 api_id               = aws_api_gateway_rest_api.movies_api.id
 http_method          = "GET"
 resource_id          = aws_api_gateway_resource.movies_root_resource.id
 resource_path        = aws_api_gateway_resource.movies_root_resource.path
 integration_uri      = module.get_movie_lambda.invoke_arn
 lambda_function_name = module.get_movie_lambda.name
 region               = var.region
 account_id           = vat.account_id
}
In the variables.tf, add the variable for account_id:
variable "account_id" {
 description = "The ID of the default AWS account"
 type        = string
}
You can either add your account ID to the variables.tfvars files, or you can add an environment variable with prefix TF_VAR_, Terraform will convert it to the name after the prefix, so TF_VAR_account_id to add the workflow Terraform Plan and the Terraform Apply steps:
jobs:
  terraform:
    name: 'Terraform'
    runs-on: ubuntu-latest
    env:
      TF_VAR_account_id: YOUR_ACCOUNT_ID
Just remember to replace the value of YOUR_ACCOUNT_ID for your account account ID value. This will generate an API with the resource movies, which will be the path /movies of your API. It will also create a stage named live. Stages are the equivalent of deployment environments. You need the API deployed to a stage to call it. So, for our movies endpoint, it will be /live/movies.
Then, it will create a deployment that will configure a rule that it should deploy to the live stage whenever we make changes to the method, integration, or resource.
Now, push it to GitHub and wait for the workflow and your API to be created. After it is finished, you can go to the API Gateway page of AWS and see your API.
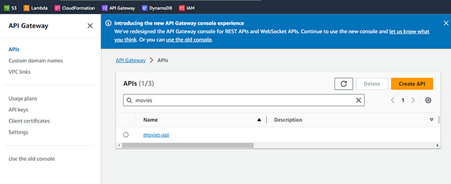
Fig. 8
And when you click on it, you can see all the details about the resources:

Fig. 9
To see the public URL, you can go to the Stages section:
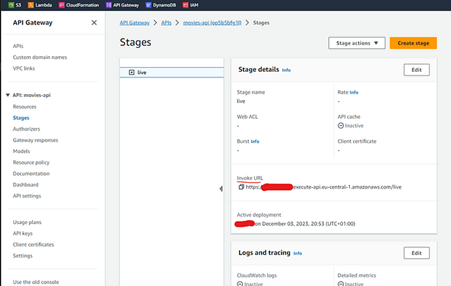
Fig. 10
Now, if you call the /movies in your browser, you should get the response from the Lambda:
Fig. 11
We must make one adjustment to ensure we use the correct path. We created the resource /movies and added the method GET there, but our lambda will fetch a movie by ID in the future, so we need to create a new resource to attach our lambda to it correctly.
So, let’s create a new resource by adding the following code to the root rest-api.tf file:
resource "aws_api_gateway_resource" "movie_resource" {
 parent_id   = aws_api_gateway_resource.movies_root_resource.id
 path_part   = "{movieID}"
 rest_api_id = aws_api_gateway_rest_api.movies_api.id
}
Add it to the redeployment trigger in the movies_api_deployment:
resource "aws_api_gateway_deployment" "movies_api_deployment" {
 rest_api_id = aws_api_gateway_rest_api.movies_api.id

 triggers = {
   redeployment = sha1(jsonencode([
     aws_api_gateway_resource.movies_root_resource.id,
     aws_api_gateway_resource.movie_resource.id,
     module.get_movie_method.id,
     module.get_movie_method.integration_id,
   ]))
 }

 lifecycle {
   create_before_destroy = true
 }
}
And then modifying the get_movie_method module to point to the new resource:
module "get_movie_method" {
 source               = "./modules/rest-api-method"
 api_id               = aws_api_gateway_rest_api.movies_api.id
 http_method          = "GET"
 resource_id          = aws_api_gateway_resource.movie_resource.id
 resource_path        = aws_api_gateway_resource.movie_resource.path
 integration_uri      = module.get_movie_lambda.invoke_arn
 lambda_function_name = module.get_movie_lambda.name
}
Push the code to GitHub, and Terraform will modify your infrastructure. Your API should look like this:
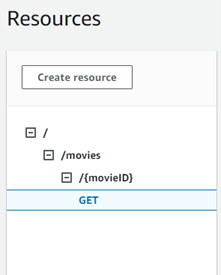
Fig. 12
Then, you can call the URL now with the ID /movies/123, for example, and you should get the same result as before.
Adding DynamoDB: Now that we have a functioning API let’s add our database, DynamoDB, and hook it to our GET endpoint with some seed data.
Terraforming DynamoDB: So, let’s start by adding a new file to our iac folder named dynamodb.tf with the following code:
resource "aws_dynamodb_table" "movies-table" {
 name           = "Movies"
 billing_mode   = "PROVISIONED"
 read_capacity  = 1
 write_capacity = 1
 hash_key       = "ID"
 range_key      = "Title"

 attribute {
   name = "ID"
   type = "S"
 }
}
This will generate a minimum capacity table named Movies, and with a partition key named ID of type string. When you push the code to GitHub, and the action runs, you can go to the DynamoDB section of AWS and see the Movies table there.
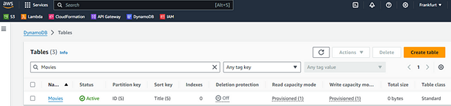
Fig. 13
Let’s add a few seed items. In the dynamodb.tf file, add the following code for four table items:
resource "aws_dynamodb_table_item" "the_matrix" {
 table_name = aws_dynamodb_table.movies-table.name
 hash_key   = aws_dynamodb_table.movies-table.hash_key
 range_key  = aws_dynamodb_table.movies-table.range_key

 item = jsonencode(
   {
     ID    = { S = "1" },
     Title = { S = "The Matrix" },
     Genres = { SS = [
       "Action",
       "Sci-Fi",
       ]
     },
     Rating = { N = "8.7" }
   }
 )
}

resource "aws_dynamodb_table_item" "scott_pilgrim" {
 table_name = aws_dynamodb_table.movies-table.name
 hash_key   = aws_dynamodb_table.movies-table.hash_key
 range_key  = aws_dynamodb_table.movies-table.range_key

 item = jsonencode(
   {
     ID    = { S = "2" },
     Title = { S = "Scott Pilgrim vs. the World" },
     Genres = { SS = [
       "Action",
       "Comedy",
       ]
     },
     Rating = { N = "7.5" }
   }
 )
}

resource "aws_dynamodb_table_item" "star_wars" {
 table_name = aws_dynamodb_table.movies-table.name
 hash_key   = aws_dynamodb_table.movies-table.hash_key
 range_key  = aws_dynamodb_table.movies-table.range_key

 item = jsonencode(
   {
     ID    = { S = "3" },
     Title = { S = "Star Wars: Episode IV - A New Hope" },
     Genres = { SS = [
       "Action",
       "Adventure",
       "Fantasy",
       "Sci-Fi",
       ]
     },
     Rating = { N = "8.6" }
   }
 )
}

resource "aws_dynamodb_table_item" "star_wars_v" {
 table_name = aws_dynamodb_table.movies-table.name
 hash_key   = aws_dynamodb_table.movies-table.hash_key
 range_key  = aws_dynamodb_table.movies-table.range_key

 item = jsonencode(
   {
     ID    = { S = "4" },
     Title = { S = "Star Wars: Episode V - The Empire Strikes Back" },
     Genres = { SS = [
       "Action",
       "Adventure",
       "Fantasy",
       "Sci-Fi",
       ]
     },
     Rating = { N = "8.7" }
   }
 )
}
Now push to GitHub, wait for the workflow to run, and go to the DynamoDB Table in AWS to explore the table items and see the created records:
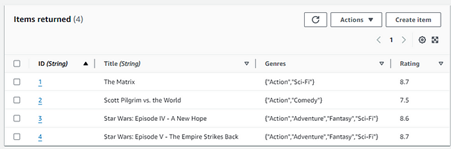
Fig. 14
Updating the Lambda to fetch by ID
Now that we have our data, we need to modify our lambda to fetch our items. First, we need to give our Lambda role rights to do GetItem actions in the Movies table. Add the following code to the outputs.tf file in the lambda module folder:
output "role_name" {
 value = aws_iam_role.iam_for_lambda.name
}
Now, in the iac folder, add a file named iam-polices.tf with the following code:
data "aws_iam_policy_document" "get_movie_item" {
 statement {
   effect = "Allow"

   actions = [
     "dynamodb:GetItem",
   ]

   resources = [
     aws_dynamodb_table.movies-table.arn
   ]
 }
}

resource "aws_iam_policy" "get_movie_item" {
 name        = "get_movie_item"
 path        = "/"
 description = "IAM policy allowing GET Item on Movies DynamoDB table"
 policy      = data.aws_iam_policy_document.get_movie_item.json
}

resource "aws_iam_role_policy_attachment" "allow_getitem_get_movie_lambda" {
 role       = module.get_movie_lambda.role_name
 policy_arn = aws_iam_policy.get_movie_item.arn
}
This will generate a policy that allows GetItem in the Movies table and attach it to the current lambda IAM role. Now, in the root folder, create a folder named apps, and then a folder get-movie. Inside this folder, let’s start a npm project with:
npm init -y
This will generate a new package.json file. Most packages required for the lambda to work and connect with AWS are already packed in AWS and updated occasionally. We are creating this mostly to have the packages available in our local development environment and to set up our module types.
In the package.json file, add the following property:
"type": "module"
Your file should look similar to:
{
 "name": "get-movie",
 "version": "1.0.0",
 "description": "",
 "main": "index.js",
 "type": "module",
 "scripts": {
   "test": "echo \"Error: no test specified\" && exit 1"
 },
 "keywords": [],
 "author": "",
 "license": "ISC"
}
Note that if the package is unavailable in the AWS environment, you must pack the node_modules folder with your lambda function code. Or create a Lambda layer that will hold the node_modules and can be shared between lambdas.
Let’s install the packages we’ll need with:
npm i --save aws-sdk @aws-sdk/client-dynamodb @aws-sdk/lib-dynamodb
Now, create a folder named src and add a file index.js in it. We’ll add the code to fetch a movie by its ID with:
import { DynamoDBClient } from "@aws-sdk/client-dynamodb";
import { DynamoDBDocumentClient, GetCommand } from "@aws-sdk/lib-dynamodb";

const tableName = "Movies";

export const handler = async (event) => {
 const movieID = event.pathParameters?.movieID;

 if (!movieID) {
   return {
     statusCode: 400,
     body: JSON.stringify({
       message: "Movie ID missing",
     }),
   };
 }

 console.log("Getting movie with ID ", movieID);

 const client = new DynamoDBClient({});
 const docClient = DynamoDBDocumentClient.from(client);

 const command = new GetCommand({
   TableName: tableName,
   Key: {
     ID: movieID.toString(),
   },
 });

 try {
   const dynamoResponse = await docClient.send(command);
   if (!dynamoResponse.Item) {
     return {
       statusCode: 404,
       body: JSON.stringify({
         message: "Movie not found",
       }),
     };
   }

   const body = {
     title: dynamoResponse.Item.Title,
     rating: dynamoResponse.Item.Rating,
     id: dynamoResponse.Item.ID,
   };

   body.genres = Array.from(dynamoResponse.Item.Genres);

   const response = {
     statusCode: 200,
     body: JSON.stringify(body),
   };

   return response;
 } catch (e) {
   console.log(e);

   return {
     statusCode: 500,
     body: JSON.stringify({
       message: e.message,
     }),
   };
 }
};
This lambda gets the event sent by API Gateway and extracts the movie ID. Then we do some simple validations and get the movie from DynamoDB, transform the data to an API resource so we don’t expose our data model, and return it to the API Gateway to send to the client.
You can see the documentation here if you’d like to learn more about the event from API Gateway with Lambda proxy integration. Remember to stringify the body, or you’ll face 500 errors.
Building and deploying
Lastly, we must create a quick build script to organize our code. First, install the following package:
npm i -D copyfiles
I’m using it because it makes commands to copy files independent from operating systems. In the package.json file, add the following build script:
{
 "name": "get-movie",
 "version": "1.0.0",
 "description": "",
 "main": "index.js",
 "type": "module",
 "scripts": {
   "build": "copyfiles -u 1 src/**/* build/ && copyfiles package.json build/",
   "test": "echo \"Error: no test specified\" && exit 1"
 },
 "keywords": [],
 "author": "",
 "license": "ISC",
 "dependencies": {
   "@aws-sdk/client-dynamodb": "^3.468.0",
   "@aws-sdk/lib-dynamodb": "^3.468.0",
   "aws-sdk": "^2.1513.0"
 },
 "devDependencies": {
   "copyfiles": "^2.4.1"
 }
}
And now, let’s add the workflow that will push our code to the get-movie lambda. Create a deploy-get-movie-lambda.yml file in the .github/workflows folder and add the following code:
name: Deploy Get Movie Lambda
on:
 push:
   branches:
     - main
   paths:
     - apps/get-movie/**/*
     - .github/workflows/deploy-get-movie-lambda.yml

defaults:
 run:
   working-directory: apps/get-movie/

jobs:
 terraform:
   name: "Deploy GetMovie Lambda"
   runs-on: ubuntu-latest
   steps:
     # Checkout the repository to the GitHub Actions runner
     - name: Checkout
       uses: actions/checkout@v3

     - name: Setup NodeJS
       uses: actions/setup-node@v4
       with:
         node-version: 20

     - name: Configure AWS Credentials Action For GitHub Actions
       uses: aws-actions/configure-aws-credentials@v1
       with:
         aws-access-key-id: ${{ secrets.AWS_ACCESS_KEY }}
         aws-secret-access-key: ${{ secrets.AWS_SECRET_ACCESS_KEY }}
         aws-region: eu-central-1

     - name: Install packages
       run: npm install

     - name: Build
       run: npm run build

     - name: Zip build
       run: zip -r -j main.zip ./build

     - name: Update Lambda code
       run: aws lambda update-function-code --function-name=get-movie --zip-file=fileb://main.zip
Remember to set the correct region. Now push the code to GitHub, wait for it to run, and then call the API Gateway endpoint /movies/1. You should receive a response similar to:
{
 "id":"1",
 "title":"The Matrix",
 "rating":8.7,
 "genres":[
   "Action",
   "Sci-Fi"
 ]
}
Amazing! We have our first endpoint completed!
Implementing Create Movie endpoint
Let’s start by creating the action to create a movie. For the new lambda, let’s use Go as the runtime. So, we need to adapt our Lambda module to allow us to define it. In the variables.tf of the lambda module, let’s add a new variable for the runtime:
variable "runtime" {
 description = "The runtime for the Lambda function [nodejs20.x, go1.x]"
 type        = string
 default     = "nodejs20.x"
}

variable "name" {
 description = "The name of the Lambda function"
 type        = string
 nullable    = false
}

variable "handler" {
 description = "The handler function in your code for he Lambda function"
 type        = string
 default     = "index.handler"
}

variable "init_filename" {
 description = "The file containing the initial code for the Lambda"
 type        = string
 default     = "index.mjs"
}
For the main.tf:
resource "aws_iam_role" "iam_for_lambda" {
 name               = "${var.name}-lambda-role"
 assume_role_policy = data.aws_iam_policy_document.assume_role.json
}

resource "aws_lambda_function" "lambda" {
 filename      = data.archive_file.lambda.output_path
 function_name = var.name
 role          = aws_iam_role.iam_for_lambda.arn
 handler       = var.handler
 runtime       = var.runtime
}
And for the datasources.tf, let’s modify our code to calculate the correct file to use, depending on the runtime:
data "archive_file" "lambda" {
 type        = "zip"
 source_file = "./modules/lambda/init_code/${var.init_filename}"
 output_path = "lambda_function_payload.zip"
}

data "aws_iam_policy_document" "assume_role" {
 statement {
   effect = "Allow"
   principals {
     type        = "Service"
     identifiers = ["lambda.amazonaws.com"]
   }
   actions = ["sts:AssumeRole"]
 }
}
Note that we use locals to define which init code will be used depending on the runtime. You already have the index.js file in the init_code folder. You can use the already-built Go main file in this repository. Or you can compile your own with the following code:
package main

import (
  "context"
  "github.com/aws/aws-lambda-go/lambda"
)

type MyEvent struct {
  Name string `json:"name"`
}

type Response struct {
  Body       string `json:"body"`
  StatusCode int    `json:"statusCode"`
}

func HandleRequest(ctx context.Context, event *MyEvent) (*Response, error) {
  message := Response{
     Body:       "Hello from Lambda!",
     StatusCode: 200,
  }

  return &message, nil
}

func main() {
  lambda.Start(HandleRequest)
}
You can find the code and build instructions here. Now, let’s add our module to the iac/lambdas.tf file:
module "create_movie_lambda" {
 source        = "./modules/lambda"
 name          = "create-movie"
 runtime       = "go1.x"
 handler       = "main"
}
To see a full list of all supported runtimes, check the documentation here.
Let’s also give our lambda permissions to add items to our table. In the iac/iam-policies.tf add:
data "aws_iam_policy_document" "put_movie_item" {
 statement {
   effect = "Allow"

   actions = [
     "dynamodb:PutItem",
   ]

   resources = [
     aws_dynamodb_table.movies-table.arn
   ]
 }
}

resource "aws_iam_policy" "put_movie_item" {
 name        = "put_movie_item"
 path        = "/"
 description = "IAM policy allowing PUT Item on Movies DynamoDB table"
 policy      = data.aws_iam_policy_document.put_movie_item.json
}

resource "aws_iam_role_policy_attachment" "allow_putitem_create_movie_lambda" {
 role       = module.create_movie_lambda.role_name
 policy_arn = aws_iam_policy.put_movie_item.arn
}
We need to add a new method to our iac/rest-api.tf file to link it to our lambda:
module "create_movie_method" {
 source               = "./modules/rest-api-method"
 api_id               = aws_api_gateway_rest_api.movies_api.id
 http_method          = "POST"
 resource_id          = aws_api_gateway_resource.movies_root_resource.id
 resource_path        = aws_api_gateway_resource.movies_root_resource.path
 integration_uri      = module.create_movie_lambda.invoke_arn
 lambda_function_name = module.create_movie_lambda.name
 region               = var.region
 account_id           = var.account_id
}
And then add the create_movie_method configuration to our deployment resource in the same file:
resource "aws_api_gateway_deployment" "movies_api_deployment" {
 rest_api_id = aws_api_gateway_rest_api.movies_api.id

 triggers = {
   redeployment = sha1(jsonencode([
     aws_api_gateway_resource.movies_root_resource.id,
     aws_api_gateway_resource.movie_resource.id,
     module.get_movie_method.id,
     module.get_movie_method.integration_id,
     module.create_movie_method.id,
     module.create_movie_method.integration_id,
   ]))
 }

 lifecycle {
   create_before_destroy = true
 }
}
Now push the code to GitHub and see the lambda, and API be created:
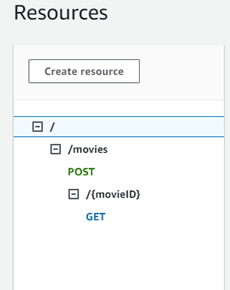
Fig. 15
New API endpoint
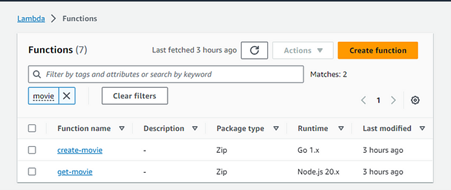
Fig. 16
Lambda functions
You can test it by making a POST HTTP request to /movies, you should get a response with status 200 and a body like this:
Hello from Lambda!
Now, we need to code our lambda. In the folder apps, create a new folder named create-movie. Navigate to the folder and run the following code to initialize a new go module:
go init example-movies.com/create-movie
Then, run the following code to get the necessary packages we’ll require:
go get "github.com/aws/aws-lambda-go"
go get "github.com/aws/aws-sdk-go"
go get "github.com/google/uuid"
Now, let’s set our models in a models.go file: package main
type Request struct {
  Title  string   `json:"title"`
  Rating float64  `json:"rating"`
  Genres []string `json:"genres"`
}

type Response struct {
  ID     string   `json:"id"`
  Title  string   `json:"title"`
  Rating float64  `json:"rating"`
  Genres []string `json:"genres"`
}

type ErrorResponse struct {
  Message string `json:"message"`
}

type Movie struct {
  ID     string   `dynamodbav:",string"`
  Title  string   `dynamodbav:",string"`
  Genres []string `dynamodbav:",stringset"`
  Rating float64  `dynamodbav:",number"`
}
And then for our Lambda, a simple, straightforward implementation:
package main

import (
  "context"
  "encoding/json"

  "github.com/aws/aws-lambda-go/events"
  "github.com/aws/aws-lambda-go/lambda"
  "github.com/aws/aws-sdk-go/aws"
  "github.com/aws/aws-sdk-go/aws/session"
  "github.com/aws/aws-sdk-go/service/dynamodb"
  "github.com/aws/aws-sdk-go/service/dynamodb/dynamodbattribute"
  "github.com/google/uuid"
)

func handleRequest(ctx context.Context, request events.APIGatewayProxyRequest) (events.APIGatewayProxyResponse, error) {
  var newMovie Request
  err := json.Unmarshal([]byte(request.Body), &newMovie)

  if err != nil {
    response, _ := json.Marshal(ErrorResponse{
      Message: "Got error marshalling new movie item, " + err.Error(),
     })

    return events.APIGatewayProxyResponse{
      Body:       string(response),
      StatusCode: 500,
    }, nil
  }

  sess := session.Must(session.NewSessionWithOptions(session.Options{
    SharedConfigState: session.SharedConfigEnable,
  }))

  // Create DynamoDB client
  dynamoDbService := dynamodb.New(sess)

  item := Movie{
   ID:     uuid.NewString(),
   Title:  newMovie.Title,
   Genres: newMovie.Genres,
   Rating: newMovie.Rating,
  }

  av, err := dynamodbattribute.MarshalMap(item)
  if err != nil {
   response, _ := json.Marshal(ErrorResponse{
    Message: "Got error marshalling new movie item to DynamoAttribute, " + err.Error(),
   })

   return events.APIGatewayProxyResponse{
      Body:       string(response),
    StatusCode: 500,
   }, nil
  }

  // Create item in table Movies
  tableName := "Movies"

  input := &dynamodb.PutItemInput{
   Item:      av,
   TableName: aws.String(tableName),
  }

  _, err = dynamoDbService.PutItem(input)
  if err != nil {
   response, _ := json.Marshal(ErrorResponse{
    Message: "Got error calling PutItem, " + err.Error(),
   })

   return events.APIGatewayProxyResponse{
    Body:       string(response),
    StatusCode: 500,
   }, nil
  }

  responseData := Response{
   ID:     item.ID,
   Title:  item.Title,
   Genres: item.Genres,
   Rating: item.Rating,
  }

  responseBody, err := json.Marshal(responseData)

  response := events.APIGatewayProxyResponse{
   Body:       string(responseBody),
   StatusCode: 200,
  }

  return response, nil
}

func main() {
  lambda.Start(handleRequest)
}
Deploying the lambda
We now have our lambda and infrastructure ready. It is time to deploy it. In the .github/workflows folder, create a new file named deploy-create-movie-lambda.yml. In it, add the following workflow code to build and deploy our Go lambda:
name: Deploy Create Movie Lambda
on:
 push:
   branches:
     - main
   paths:
     - apps/create-movie/**/*
     - .github/workflows/deploy-create-movie-lambda.yml

defaults:
 run:
   working-directory: apps/create-movie/

jobs:
 terraform:
   name: "Deploy CreateMovie Lambda"
   runs-on: ubuntu-latest
   steps:
     # Checkout the repository to the GitHub Actions runner
     - name: Checkout
       uses: actions/checkout@v3

     - uses: actions/[email protected]
       with:
         go-version: "1.21.4"

     - name: Configure AWS Credentials Action For GitHub Actions
       uses: aws-actions/configure-aws-credentials@v1
       with:
         aws-access-key-id: ${{ secrets.AWS_ACCESS_KEY }}
         aws-secret-access-key: ${{ secrets.AWS_SECRET_ACCESS_KEY }}
         aws-region: eu-central-1 # Set your region here

     - name: Build Lambda
       run: GOOS=linux GOARCH=amd64 CGO_ENABLED=0 go build -o build/ .

       # The lambda requires that the executing file be named "main"
     - name: Rename file
       run: mv ./build/create-movie ./build/main

     - name: Zip build
       run: zip -r -j main.zip ./build

     - name: Update Lambda code
       run: aws lambda update-function-code --function-name=create-movie --zip-file=fileb://main.zip
Don’t forget to change the aws-region to your region. Once you deploy it, you can send POST request to /movies with a similar body:
{
   "title": "Starship Troopers",
   "genres": ["Action", "Sci-Fi"],
   "rating": 7.3
}
And you should get a similar response:
{
   "id": "4e70fef6-d9cc-4056-bf9b-e513cdabc69f",
   "title": "Starship Troopers",
   "rating": 7.3,
   "genres": [
       "Action",
       "Sci-Fi"
   ]
}
Great! We have our endpoints to get a movie and to create a movie. Let’s go to our next step and create one to delete a movie.
Deleting a movie
Now let’s add our module to the iac/lambdas.tf file:
module "delete_movie_lambda" {
 source        = "./modules/lambda"
 name          = "delete-movie"
 runtime       = "nodejs20.x"
 handler       = "index.handler"
}
Let’s also give our lambda permissions to delete items from our table. In the iac/iam-policies.tf add:
data "aws_iam_policy_document" "delete_movie_item" {
 statement {
   effect = "Allow"

   actions = [
     "dynamodb:DeleteItem",
   ]

   resources = [
     aws_dynamodb_table.movies-table.arn
   ]
 }
}

resource "aws_iam_policy" "delete_movie_item" {
 name        = "delete_movie_item"
 path        = "/"
 description = "IAM policy allowing DELETE Item on Movies DynamoDB table"
 policy      = data.aws_iam_policy_document.delete_movie_item.json
}

resource "aws_iam_role_policy_attachment" "allow_deleteitem_delete_movie_lambda" {
 role       = module.delete_movie_lambda.role_name
 policy_arn = aws_iam_policy.delete_movie_item.arn
}
We need to add a new method to our iac/rest-api.tf file to link it to our lambda:
module "delete_movie_method" {
 source               = "./modules/rest-api-method"
 api_id               = aws_api_gateway_rest_api.movies_api.id
 http_method          = "DELETE"
 resource_id          = aws_api_gateway_resource.movie_resource.id
 resource_path        = aws_api_gateway_resource.movie_resource.path
 integration_uri      = module.delete_movie_lambda.invoke_arn
 lambda_function_name = module.delete_movie_lambda.name
 region               = var.region
 account_id           = var.account_id
}
And then add the delete_movie_method configuration to our deployment resource in the same file:
resource "aws_api_gateway_deployment" "movies_api_deployment" {
 rest_api_id = aws_api_gateway_rest_api.movies_api.id

 triggers = {
   redeployment = sha1(jsonencode([
     aws_api_gateway_resource.movies_root_resource.id,
     aws_api_gateway_resource.movie_resource.id,
     module.get_movie_method.id,
     module.get_movie_method.integration_id,
     module.create_movie_method.id,
     module.create_movie_method.integration_id,
     module.delete_movie_method.id,
     module.delete_movie_method.integration_id,
   ]))
 }

 lifecycle {
   create_before_destroy = true
 }
}
Now push the code to GitHub and see the lambda, and API be created:
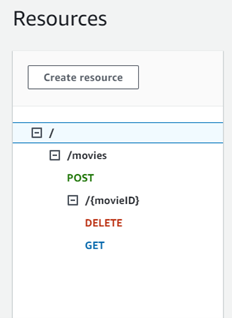
Fig. 17
And the lambda:
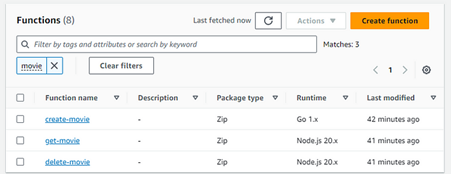
Fig. 18
Coding the lambda in Typescript
For our delete movie lambda, I want to show you how easily it is to use Typescript to develop it. Let’s do as before and create a new folder under apps named delete-movie, navigate to it in the terminal and run the following script to initialize our npm project:
npm init -y
Now let’s add Typescript with:
npm i -D typescript
And then add the property type with value module and a new npm script named tsc with the code tsc:
{
 "name": "get-movie",
 "version": "1.0.0",
 "description": "",
 "main": "index.js",
 "type": "module",
 "scripts": {
   "tsc": "tsc",
   "test": "echo \"Error: no test specified\" && exit 1"
 },
 "keywords": [],
 "author": "",
 "license": "ISC",,
 "devDependencies": {
   "typescript": "^5.3.3"
 }
}
Run the following code to start our Typescript project and generate a typescript.json file:
npm run tsc -- --init --target esnext --module nodenext \
--moduleResolution nodenext --rootDir src \
--outDir build --noImplicitAny --noImplicitThis --newLine lf \
--resolveJsonModule
If you are on Windows, run the following:
npm run tsc -- --init --target esnext --module nodenext `
--moduleResolution nodenext --rootDir src `
--outDir build --noImplicitAny --noImplicitThis --newLine lf `
--resolveJsonModule
Now let’s add our dependencies:
npm i -s @aws-sdk/client-dynamodb @aws-sdk/lib-dynamodb aws-sdk
npm i -D @types/aws-lambda copyfiles
Great! Now for our lambda implementation code, create a src folder and then an index.ts file with the following code:
import { DynamoDBClient } from "@aws-sdk/client-dynamodb";
import { DynamoDBDocumentClient, DeleteCommand } from "@aws-sdk/lib-dynamodb";
import { APIGatewayProxyEvent, APIGatewayProxyResult } from "aws-lambda";

const tableName = "Movies";

export const handler = async (event: APIGatewayProxyEvent): Promise<APIGatewayProxyResult> => {
 const movieID = event.pathParameters?.movieID;

 if (!movieID) {
   return {
     statusCode: 400,
     body: JSON.stringify({
       message: "Movie ID missing",
     }),
   };
 }

 console.log("Deleting movie with ID ", movieID);

 const client = new DynamoDBClient({});
 const docClient = DynamoDBDocumentClient.from(client);

 const command = new DeleteCommand({
   TableName: tableName,
   Key: {
     ID: movieID.toString(),
   },
 });

 try {
   await docClient.send(command);

   return {
     statusCode: 204,
     body: JSON.stringify({
       message: `Movie ${movieID} deleted`,
     }),
   };
 } catch (e: any) {
   console.log(e);

   return {
     statusCode: 500,
     body: JSON.stringify({
       message: e.message,
     }),
   };
 }
};
Now we just need to add our build npm script and our deploy workflow. For the build script, add a new npm script named build:
{
 "name": "get-movie",
 "version": "1.0.0",
 "description": "",
 "main": "index.js",
 "type": "module",
 "scripts": {
   "tsc": "tsc",
   "build": "tsc && copyfiles package.json build/",
   "test": "echo \"Error: no test specified\" && exit 1"
 },
 "keywords": [],
 "author": "",
 "license": "ISC",
 "dependencies": {
   "@aws-sdk/client-dynamodb": "^3.470.0",
   "@aws-sdk/lib-dynamodb": "^3.470.0",
   "aws-sdk": "^2.1515.0"
 },
 "devDependencies": {
   "@types/aws-lambda": "^8.10.130",
   "copyfiles": "^2.4.1",
   "typescript": "^5.3.3"
 }
}
Again, we copy our package.json file to let our Lambda runtime know about our project configurations. Also, if you need extra packages, you might need to download your node packages before and ship it to your lambda with your main code.
Now for the GitHub actions workflow, create a deploy-delete-movie-lambda.yml file in the .github/workflows folder with the code:
name: Deploy Delete Movie Lambda
on:
 push:
   branches:
     - main
   paths:
     - apps/delete-movie/**/*
     - .github/workflows/deploy-delete-movie-lambda.yml

defaults:
 run:
   working-directory: apps/delete-movie/

jobs:
 terraform:
   name: "Deploy DeleteMovie Lambda"
   runs-on: ubuntu-latest
   steps:
     # Checkout the repository to the GitHub Actions runner
     - name: Checkout
       uses: actions/checkout@v3

     - name: Setup NodeJS
       uses: actions/setup-node@v4
       with:
         node-version: 20

     - name: Configure AWS Credentials Action For GitHub Actions
       uses: aws-actions/configure-aws-credentials@v1
       with:
         aws-access-key-id: ${{ secrets.AWS_ACCESS_KEY }}
         aws-secret-access-key: ${{ secrets.AWS_SECRET_ACCESS_KEY }}
         aws-region: eu-central-1

     - name: Install packages
       run: npm install

     - name: Build
       run: npm run build

     - name: Zip build
       run: zip -r -j main.zip ./build

     - name: Update Lambda code
       run: aws lambda update-function-code --function-name=delete-movie --zip-file=fileb://main.zip
Push your code to GitHub and wait for it to succeed.
Now, as the deployed code is Javascript, you can see it in the delete-movie lambda. You can make a DELETE HTTP request to the /movies/{movieID} URL and receive a 204 status code. Then you can check the Movies table in DynamoDB to see that your record was deleted.
Awesome! Now let’s dive into updating a movie.
Updating a movie
As the code will be similar, let’s also build this one using Go. Let’s add our infrastructure to the iac/lambdas.tf file:
module "update_movie_lambda" {
 source  = "./modules/lambda"
 name    = "update-movie"
 runtime = "go1.x"
 handler = "main"
}
Let’s also give our lambda permissions to update items from our table. In the iac/iam-policies.tf add:
data "aws_iam_policy_document" "update_movie_item" {
 statement {
   effect = "Allow"

   actions = [
     "dynamodb:UpdateItem",
   ]

   resources = [
     aws_dynamodb_table.movies-table.arn
   ]
 }
}

resource "aws_iam_policy" "update_movie_item" {
 name        = "update_movie_item"
 path        = "/"
 description = "IAM policy allowing UPDATE Item on Movies DynamoDB table"
 policy      = data.aws_iam_policy_document.update_movie_item.json
}

resource "aws_iam_role_policy_attachment" "allow_updateitem_update_movie_lambda" {
 role       = module.update_movie_lambda.role_name
 policy_arn = aws_iam_policy.update_movie_item.arn
}
We need to add a new method to our iac/rest-api.tf file to link it to our lambda:
module "update_movie_method" {
 source               = "./modules/rest-api-method"
 api_id               = aws_api_gateway_rest_api.movies_api.id
 http_method          = "PUT"
 resource_id          = aws_api_gateway_resource.movie_resource.id
 resource_path        = aws_api_gateway_resource.movie_resource.path
 integration_uri      = module.update_movie_lambda.invoke_arn
 lambda_function_name = module.update_movie_lambda.name
 region               = var.region
 account_id           = var.account_id
}
And then add the update_movie_method configuration to our deployment resource in the same file:
resource "aws_api_gateway_deployment" "movies_api_deployment" {
 rest_api_id = aws_api_gateway_rest_api.movies_api.id
 triggers = {

   redeployment = sha1(jsonencode([
     aws_api_gateway_resource.movies_root_resource.id,
     aws_api_gateway_resource.movie_resource.id,
     module.get_movie_method.id,
     module.get_movie_method.integration_id,
     module.create_movie_method.id,
     module.create_movie_method.integration_id,
     module.delete_movie_method.id,
     module.delete_movie_method.integration_id,
     module.update_movie_method.id,
     module.update_movie_method.integration_id,
   ]))
 }

 lifecycle {
   create_before_destroy = true
 }
}
Now push the code to GitHub and see the lambda, and API be created:
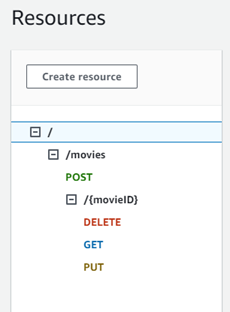
Fig. 19
And the lambdas:
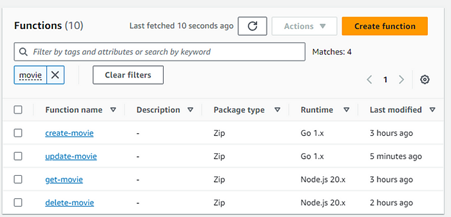
Fig. 20
Now, test the integration by making a PUT HTTP request to /movies/{movieID} and you should get back a 200 status code with:
Hello from Lambda!
Implementing the lambda code
In the folder apps, create a new folder named update-movie. Navigate to the folder and run the following code to initialize a new go module:
go init example-movies.com/update-movie
Then, run the following code to get the necessary packages we’ll require:
go get "github.com/aws/aws-lambda-go"
go get "github.com/aws/aws-sdk-go"
Now, let’s set our models in a models.go file:
package main

type Request struct {
  Title  string   `json:"title"`
  Rating float64  `json:"rating"`
  Genres []string `json:"genres"`
}

type ErrorResponse struct {
  Message string `json:"message"`
}

type MovieData struct {
  Title  string   `dynamodbav:":title,string" json:"title"`
  Genres []string `dynamodbav:":genres,stringset"  json:"genres"`
  Rating float64  `dynamodbav:":rating,number"  json:"rating"`
}
Note that we could create a shared module to reuse some of the Go code, but for the sake of simplicity, we are repeating the code here.
And then for our Lambda, a simple straightforward implementation:
package main

import (
  "context"
  "encoding/json"
  "strings"

  "github.com/aws/aws-lambda-go/events"
  "github.com/aws/aws-lambda-go/lambda"
  "github.com/aws/aws-sdk-go/aws"
  "github.com/aws/aws-sdk-go/aws/session"
  "github.com/aws/aws-sdk-go/service/dynamodb"
  "github.com/aws/aws-sdk-go/service/dynamodb/dynamodbattribute"
)

func handleRequest(ctx context.Context, request events.APIGatewayProxyRequest) (events.APIGatewayProxyResponse, error) {
  movieID := request.PathParameters["movieID"]

  if strings.TrimSpace(movieID) == "" {
    response, _ := json.Marshal(ErrorResponse{
      Message: "Movie ID invalid",
    })

    return events.APIGatewayProxyResponse{
     Body:       string(response),
     StatusCode: 400,
    }, nil
  }

  var updateMovie Request
  err := json.Unmarshal([]byte(request.Body), &updateMovie)

  if err != nil {
    response, _ := json.Marshal(ErrorResponse{
      Message: "Got error marshalling update movie item, " + err.Error(),
    })

    return events.APIGatewayProxyResponse{
      Body:       string(response),
      StatusCode: 500,
    }, nil
  }

  sess := session.Must(session.NewSessionWithOptions(session.Options{
    SharedConfigState: session.SharedConfigEnable,
  }))

  // Create DynamoDB client
  dynamoDbService := dynamodb.New(sess)

  movie := MovieData{
    Title:  updateMovie.Title,
    Genres: updateMovie.Genres,
    Rating: updateMovie.Rating,
  }

  attributeMapping, err := dynamodbattribute.MarshalMap(movie)

  if err != nil {
    response, _ := json.Marshal(ErrorResponse{
      Message: "Got error marshalling update movie item to DynamoAttribute, " + err.Error(),
    })

  return events.APIGatewayProxyResponse{
    Body:       string(response),
    StatusCode: 500,
   }, nil
  }

  // Create item in table Movies
  tableName := "Movies"

  input := &dynamodb.UpdateItemInput{
    ExpressionAttributeValues: attributeMapping,
    TableName:                 aws.String(tableName),
    Key: map[string]*dynamodb.AttributeValue{
      "ID": {
      S: aws.String(movieID),
     },
    },
    ReturnValues:     aws.String("UPDATED_NEW"),
    UpdateExpression: aws.String("set Rating = :rating, Title = :title, Genres = :genres"),
   }

  _, err = dynamoDbService.UpdateItem(input)
  if err != nil {
    response, _ := json.Marshal(ErrorResponse{
     Message: "Got error calling UpdateItem, " + err.Error(),
    })

    return events.APIGatewayProxyResponse{
     Body:       string(response),
     StatusCode: 500,
    }, nil
  }

  response := events.APIGatewayProxyResponse{
    StatusCode: 200,
  }

  return response, nil
}

func main() {
  lambda.Start(handleRequest)
}
And now to deploy it, in the .github/workflows, create a new deploy-update-movie-lambda.yml file and add the following code:
name: Deploy Update Movie Lambda
on:
 push:
   branches:
     - main
   paths:
     - apps/update-movie/**/*
     - .github/workflows/deploy-update-movie-lambda.yml

defaults:
 run:
   working-directory: apps/update-movie/

jobs:
 terraform:
   name: "Deploy UpdateMovie Lambda"
   runs-on: ubuntu-latest
   steps:
     # Checkout the repository to the GitHub Actions runner
     - name: Checkout
       uses: actions/checkout@v3

     - uses: actions/[email protected]
       with:
         go-version: "1.21.4"

     - name: Configure AWS Credentials Action For GitHub Actions
       uses: aws-actions/configure-aws-credentials@v1
       with:
         aws-access-key-id: ${{ secrets.AWS_ACCESS_KEY }}
         aws-secret-access-key: ${{ secrets.AWS_SECRET_ACCESS_KEY }}
         aws-region: eu-central-1

     - name: Build Lambda
       run: GOOS=linux GOARCH=amd64 CGO_ENABLED=0 go build -o build/ .

       # The lambda requires that the executing file be named "main"
     - name: Rename file
       run: mv ./build/update-movie ./build/main

     - name: Zip build
       run: zip -r -j main.zip ./build

     - name: Update Lambda code
       run: aws lambda update-function-code --function-name=update-movie --zip-file=fileb://main.zip
Now, push it to GitHub and wait for the workflow to succeed. To test, send a PUT request to /movies/{movieID} with a similar body example below:
{
   "title": "Jurassic Park",
   "rating": 8.2,
   "genres": [
       "Action",
       "Adventure",
       "Sci-Fi",
       "Thriller"
   ]
}
Adding email notification
In this part, we’ll add SNS, SQS, and a Lambda to process changes to our movie database and notify via email.
SNS stands for Simple Notification System. It is an AWS fully-managed service that sends notification messages from publishers to subscribers. SQS stands for Simple Queue Service. It is an AWS fully-managed message queue service where we can send messages that a consumer can asynchronously process. Combining both is useful for implementing a microservices architecture because it allows your systems to communicate asynchronously.
And lastly, we’ll make our lambda be triggered by a new SQS message and send an email through SES.
We will add our SNS topic and SQS queue to our Terraform code. First, in the iac folder, create a new file named messaging.tf and add the following code to generate our SNS and SQS:
resource "aws_sns_topic" "movie_updates" {
 name = "movie-updates-topic"
}

resource "aws_sqs_queue" "movie_updates_queue" {
 name   = "movie-updates-queue"
 policy = data.aws_iam_policy_document.sqs-queue-policy.json
}

resource "aws_sns_topic_subscription" "movie_updates_sqs_target" {
 topic_arn            = aws_sns_topic.movie_updates.arn
 protocol             = "sqs"
 endpoint             = aws_sqs_queue.movie_updates_queue.arn
 raw_message_delivery = true
}

data "aws_iam_policy_document" "sqs-queue-policy" {
 policy_id = "arn:aws:sqs:${var.region}:${var.account_id}:movie-updates-queue/SQSDefaultPolicy"

 statement {
   sid    = "movie_updates-sns-topic"
   effect = "Allow"

   principals {
     type        = "Service"
     identifiers = ["sns.amazonaws.com"]
   }

   actions = [
     "SQS:SendMessage",
   ]

   resources = [
     "arn:aws:sqs:${var.region}:${var.account_id}:movie-updates-queue",
   ]

   condition {
     test     = "ArnEquals"
     variable = "aws:SourceArn"

     values = [
       aws_sns_topic.movie_updates.arn,
     ]
   }
 }
}
We chose the fan-out architecture over directly publishing a message to SQS because this allows us to easily expand our microservices architecture in case we need more services to be notified about any message coming from this SNS topic. Because SNS broadcasts notification events to all subscriptions, it enables easy expansion.
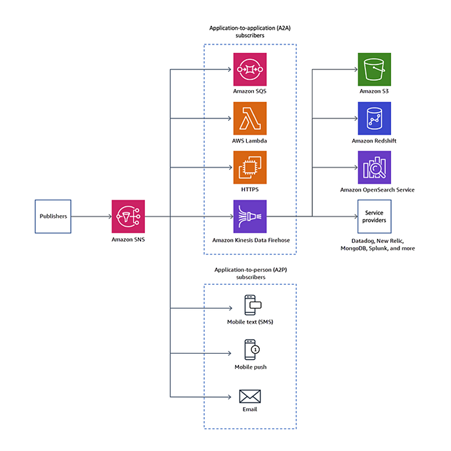
Fig. 21: SNS fan-out pattern (source: AWS)
Now, run the GitHub workflow to create our queue and topic.
Publishing events to the SNS topic
To allow our lambdas to publish the events to SNS, we first need to give them access through IAM policies. To do that, add the following code to the iam-policies.tf file in the iac folder:
data "aws_iam_policy_document" "publish_to_movies_updates_sns_topic" {
 statement {
   effect = "Allow"

   actions = [
     "sns:Publish",
   ]

   resources = [
     aws_sns_topic.movie_updates.arn
   ]
 }
}

resource "aws_iam_policy" "publish_to_movies_updates_sns_topic" {
 name        = "publish_to_movies_updates_sns_topic"
 path        = "/"
 description = "IAM policy allowing to PUBLISH events to ${aws_sns_topic.movie_updates.name}"
 policy      = data.aws_iam_policy_document.publish_to_movies_updates_sns_topic.json
}

resource "aws_iam_role_policy_attachment" "allow_publish_to_movies_update_sns_create_movie_lambda" {
 role       = module.create_movie_lambda.role_name
 policy_arn = aws_iam_policy.publish_to_movies_updates_sns_topic.arn
}

resource "aws_iam_role_policy_attachment" "allow_publish_to_movies_update_sns_delete_movie_lambda" {
 role       = module.delete_movie_lambda.role_name
 policy_arn = aws_iam_policy.publish_to_movies_updates_sns_topic.arn
}

resource "aws_iam_role_policy_attachment" "allow_publish_to_movies_update_sns_update_movie_lambda" {
 role       = module.update_movie_lambda.role_name
 policy_arn = aws_iam_policy.publish_to_movies_updates_sns_topic.arn
}
This will allow them to perform the Publish action in our SNS topic, which will broadcast the event and be picked up by our SQS queue.
Publishing events
Now, to code, let’s start with our create-movie lambda. It will send an event every time we add a new movie.
MovieCreated event
Now, go to the apps/create-movie folder. In the models.go file, let’s add a struct that will represent our event.
package main

type Request struct {
  Title  string   `json:"title"`
  Rating float64  `json:"rating"`
  Genres []string `json:"genres"`
}

type Response struct {
  ID     string   `json:"id"`
  Title  string   `json:"title"`
  Rating float64  `json:"rating"`
  Genres []string `json:"genres"`
}

type ErrorResponse struct {
  Message string `json:"message"`
}

type Movie struct {
  ID     string   `dynamodbav:",string"`
  Title  string   `dynamodbav:",string"`
  Genres []string `dynamodbav:",stringset,omitemptyelem"`
  Rating float64  `dynamodbav:",number"`
}

type MovieCreated struct {
  ID     string   `json:"id"`
  Title  string   `json:"title"`
  Rating float64  `json:"rating"`
  Genres []string `json:"genres"`
}

func (event *MovieCreated) getEventName() string {
  return "MovieCreated"
}
Ideally, you’ll want to have these events in a shared package so consumers can use them. Now, let’s edit our main.go file to publish the event every time we create a new movie:
package main

import (
  "context"
  "encoding/json"
  "fmt"

  "github.com/aws/aws-lambda-go/events"
  "github.com/aws/aws-lambda-go/lambda"
  "github.com/aws/aws-sdk-go/aws"
  "github.com/aws/aws-sdk-go/aws/session"
  "github.com/aws/aws-sdk-go/service/dynamodb"
  "github.com/aws/aws-sdk-go/service/dynamodb/dynamodbattribute"
  "github.com/aws/aws-sdk-go/service/sns"
  "github.com/google/uuid"
)

func handleRequest(ctx context.Context, request events.APIGatewayProxyRequest) (events.APIGatewayProxyResponse, error) {
  var newMovie Request
  err := json.Unmarshal([]byte(request.Body), &newMovie)

  if err != nil {
    response, _ := json.Marshal(ErrorResponse{
     Message: "Got error marshalling new movie item, " + err.Error(),
    })

    return events.APIGatewayProxyResponse{
     Body:       string(response),
     StatusCode: 500,
    }, nil
  }

  sess := session.Must(session.NewSessionWithOptions(session.Options{
    SharedConfigState: session.SharedConfigEnable,
  }))

  // Create DynamoDB client
  dynamoDbService := dynamodb.New(sess)

  item := Movie{
    ID:     uuid.NewString(),
    Title:  newMovie.Title,
    Genres: newMovie.Genres,
    Rating: newMovie.Rating,
  }

  av, err := dynamodbattribute.MarshalMap(item)
  if err != nil {
    response, _ := json.Marshal(ErrorResponse{
     Message: "Got error marshalling new movie item to DynamoAttribute, " + err.Error(),
   })

    return events.APIGatewayProxyResponse{
     Body:       string(response),
     StatusCode: 500,
    }, nil
  }

  // Create item in table Movies
  tableName := "Movies"

  input := &dynamodb.PutItemInput{
    Item:      av,
    TableName: aws.String(tableName),
  }

  _, err = dynamoDbService.PutItem(input)
  if err != nil {
    response, _ := json.Marshal(ErrorResponse{
     Message: "Got error calling PutItem, " + err.Error(),
    })

    return events.APIGatewayProxyResponse{
     Body:       string(response),
     StatusCode: 500,
    }, nil
  }

  publishEventToSNS(sess, item)

  responseData := Response{
    ID:     item.ID,
    Title:  item.Title,
    Genres: item.Genres,
    Rating: item.Rating,
  }

  responseBody, err := json.Marshal(responseData)

  response := events.APIGatewayProxyResponse{
    Body:       string(responseBody),
    StatusCode: 200,
  }

  return response, nil
}

func publishEventToSNS(sess *session.Session, item Movie) {
  snsService := sns.New(sess)

  movieCreatedEvent := MovieCreated{
    ID:     item.ID,
    Title:  item.Title,
    Rating: item.Rating,
    Genres: item.Genres,
  }

  eventJSON, err := json.Marshal(movieCreatedEvent)

  _, err = snsService.Publish(&sns.PublishInput{
    Message: aws.String(string(eventJSON)),
    MessageAttributes: map[string]*sns.MessageAttributeValue{
     "Type": {
      DataType:    aws.String("String"),
      StringValue: aws.String(movieCreatedEvent.getEventName()),
     },
    },
    TopicArn: aws.String("YOUR_SNS_TOPIC_ARN"), // Add your topic ARN here
   })

  if err != nil {
    fmt.Println(err.Error())
  }
}

func main() {
  lambda.Start(handleRequest)
}
Don’t forget to change the YOUR_SNS_TOPIC_ARN to the topic ARN that was created in the previous section through Terraform. To test it, you can create a new movie through the POST /movies endpoint, go to the SQS queue and poll for messages to see it there:
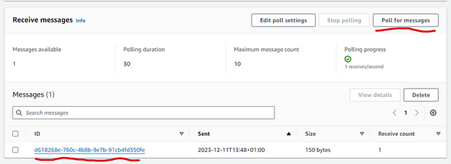
Fig. 22
When you click on it, you can see the body:
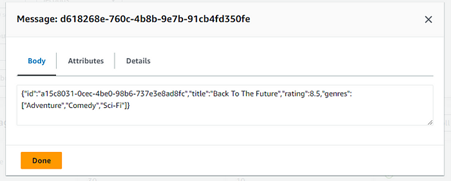
Fig. 23
And the attributes:
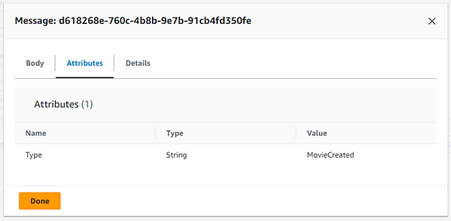
Fig. 24
MovieDeleted event
Now, let’s move to send a deleted event through our delete-movie lambda. Go to the apps/delete-movie folder and then run the following npm command to add the SNS library:
npm i -s @aws-sdk/client-sns
Now, create a new models.ts file in the src folder to add our event type:
export type MovieDeleted = {
 id: string;
};
And now, let’s publish the message to SNS in the index.ts file:
import { DynamoDBClient } from "@aws-sdk/client-dynamodb";
import { DynamoDBDocumentClient, DeleteCommand } from "@aws-sdk/lib-dynamodb";
import { APIGatewayProxyEvent, APIGatewayProxyResult } from "aws-lambda";
import { PublishCommand, SNSClient } from "@aws-sdk/client-sns";
import { MovieDeleted } from "./models.js";

const tableName = "Movies";

export const handler = async (event: APIGatewayProxyEvent): Promise<APIGatewayProxyResult> => {
 const movieID = event.pathParameters?.movieID;

 if (!movieID) {
   return {
     statusCode: 400,
     body: JSON.stringify({
       message: "Movie ID missing",
     }),
   };
 }

 console.log("Deleting movie with ID ", movieID);

 const client = new DynamoDBClient({});
 const docClient = DynamoDBDocumentClient.from(client);

 const command = new DeleteCommand({
   TableName: tableName,
   Key: {
     ID: movieID.toString(),
   },
 });

 try {
   await docClient.send(command);

   await publishEventToSNS(movieID);

   return {
     statusCode: 204,
     body: JSON.stringify({
       message: `Movie ${movieID} deleted`,
     }),
   };
 } catch (e: any) {
   console.log(e);

   return {
     statusCode: 500,
     body: JSON.stringify({
       message: e.message,
     }),
   };
 }
};

async function publishEventToSNS(movieID: string) {
 const snsClient = new SNSClient({});

 const event: MovieDeleted = {
   id: movieID,
 };

 const eventName = "MovieDeleted";

 try {
   await snsClient.send(
     new PublishCommand({
       Message: JSON.stringify(event),
       TopicArn: "YOUR_SNS_TOPIC_ARN", // Add your SNS topic ARN here
       MessageAttributes: {
         Type: {
           DataType: "String",
           StringValue: eventName,
         },
       },
     })
   );
 } catch (e: any) {
   console.warn(e);
 }
}
Don’t forget to change YOUR_SNS_TOPIC_ARN value to your actual SNS topic ARN. Now, push it to GitHub, wait for the action to succeed, and then delete an existing movie through the PUT /movies/{movieID} endpoint and check SQS for the message in the queue.
MovieUpdated event
And now for our last lambda, the update-movie lambda. Go to apps/update-movie folder and modify the models.go to add the MovieUpdated event:
package main

type Request struct {
  Title  string   `json:"title"`
  Rating float64  `json:"rating"`
  Genres []string `json:"genres"`
}

type ErrorResponse struct {
  Message string `json:"message"`
}

type MovieData struct {
  Title  string   `dynamodbav:":title,string" json:"title"`
  Genres []string `dynamodbav:":genres,stringset,omitemptyelem"  json:"genres"`
  Rating float64  `dynamodbav:":rating,number"  json:"rating"`
}

type Movie struct {
  ID     string   `json:"id"`
  Title  string   `json:"title"`
  Genres []string `json:"genres"`
  Rating float64  `json:"rating"`
}

type MovieUpdated struct {
  ID     string   `json:"id"`
  Title  string   `json:"title"`
  Rating float64  `json:"rating"`
  Genres []string `json:"genres"`
}

func (event *MovieUpdated) getEventName() string {
  return "MovieUpdated"
}
And now, to add the code to the main.go file:
package main

import (
  "context"
  "encoding/json"
  "fmt"
  "strings"

  "github.com/aws/aws-lambda-go/events"
  "github.com/aws/aws-lambda-go/lambda"
  "github.com/aws/aws-sdk-go/aws"
  "github.com/aws/aws-sdk-go/aws/session"
  "github.com/aws/aws-sdk-go/service/dynamodb"
  "github.com/aws/aws-sdk-go/service/dynamodb/dynamodbattribute"
  "github.com/aws/aws-sdk-go/service/sns"
)

func handleRequest(ctx context.Context, request events.APIGatewayProxyRequest) (events.APIGatewayProxyResponse, error) {
  movieID := request.PathParameters["movieID"]

  if strings.TrimSpace(movieID) == "" {
    response, _ := json.Marshal(ErrorResponse{
     Message: "Movie ID invalid",
    })

    return events.APIGatewayProxyResponse{
     Body:       string(response),
     StatusCode: 400,
    }, nil
  }

  var updateMovie Request
  err := json.Unmarshal([]byte(request.Body), &updateMovie)

  if err != nil {
    response, _ := json.Marshal(ErrorResponse{
     Message: "Got error marshalling update movie item, " + err.Error(),
    })

    return events.APIGatewayProxyResponse{
     Body:       string(response),
     StatusCode: 500,
    }, nil
  }

  sess := session.Must(session.NewSessionWithOptions(session.Options{
    SharedConfigState: session.SharedConfigEnable,
   }))

  // Create DynamoDB client
  dynamoDbService := dynamodb.New(sess)

  movieData := MovieData{
    Title:  updateMovie.Title,
    Genres: updateMovie.Genres,
    Rating: updateMovie.Rating,
  }

  attributeMapping, err := dynamodbattribute.MarshalMap(movieData)

  if err != nil {
    response, _ := json.Marshal(ErrorResponse{
      Message: "Got error marshalling update movie item to DynamoAttribute, " + err.Error(),
    })

    return events.APIGatewayProxyResponse{
     Body:       string(response),
     StatusCode: 500,
    }, nil
  }

  // Create item in table Movies
  tableName := "Movies"

  input := &dynamodb.UpdateItemInput{
    ExpressionAttributeValues: attributeMapping,
    TableName:                 aws.String(tableName),
    Key: map[string]*dynamodb.AttributeValue{
     "ID": {
      S: aws.String(movieID),
     },
    },
    ReturnValues:     aws.String("ALL_NEW"),
    UpdateExpression: aws.String("set Rating = :rating, Title = :title, Genres = :genres"),
  }

  updateResponse, err := dynamoDbService.UpdateItem(input)

  if err != nil {
    errorResponse, _ := json.Marshal(ErrorResponse{
     Message: "Got error calling UpdateItem, " + err.Error(),
    })

    return events.APIGatewayProxyResponse{
     Body:       string(errorResponse),
     StatusCode: 500,
    }, nil
  }

  var movie Movie
  err = dynamodbattribute.UnmarshalMap(updateResponse.Attributes, &movie)

  publishEventToSNS(sess, movie)

  response := events.APIGatewayProxyResponse{
    StatusCode: 200,
  }

  return response, nil
}

func publishEventToSNS(sess *session.Session, item Movie) {
  snsService := sns.New(sess)

  movieUpdatedEvent := MovieUpdated{
    ID:     item.ID,
    Title:  item.Title,
    Rating: item.Rating,
    Genres: item.Genres,
  }

  eventJSON, err := json.Marshal(movieUpdatedEvent)

  _, err = snsService.Publish(&sns.PublishInput{
    Message: aws.String(string(eventJSON)),
    MessageAttributes: map[string]*sns.MessageAttributeValue{
     "Type": {
       DataType:    aws.String("String"),
       StringValue: aws.String(movieUpdatedEvent.getEventName()),
     },
    },
    TopicArn: aws.String("YOUR_SNS_TOPIC_ARN"),
  })

  if err != nil {
    fmt.Println(err.Error())
  }
}

func main() {
  lambda.Start(handleRequest)
}
Don’t forget to change YOUR_SNS_TOPIC_ARN value to your actual SNS topic ARN. Now, push the code to GitHub, wait for 0the workflow to succeed, and test it by updating a movie and checking back on SQS for the MovieUpdated event.
Processing the SQS messages
Now, let’s build our lambda for processing our event messages in SQS. Ideally, we’d create one lambda to be responsible for each event type, but for simplicity, we’ll create a generic one to handle all three.
Let’s start by adding a new NodeJS lambda with a SQS trigger to our iac/lambdas.tf file:
module "process_movie_update_events_lambda" {
 source  = "./modules/lambda"
 name    = "process-movie-update-events"
 runtime = "nodejs20.x"
 handler = "index.handler"
}

resource "aws_lambda_event_source_mapping" "movie_update_events_trigger" {
 event_source_arn = aws_sqs_queue.movie_updates_queue.arn
 function_name    = module.process_movie_update_events_lambda.arn
 enabled          = true
}
If you’d like to set filter_criteria, please note that the Lambda Event Filter deletes messages from the Queue when they don’t match the filter criteria. This means the message won’t be available to be polled in the SQS queue anymore if they don’t match the filter criteria.
It is very important to note that lambda trigger filters. We also need to add permissions to this lambda to pull messages from our SQS queue. In the iam-policies.tf add:
data "aws_iam_policy_document" "pull_message_from_sqs" {
 statement {
   effect = "Allow"

   actions = [
     "sqs:ReceiveMessage",
     "sqs:DeleteMessage",
     "sqs:GetQueueAttributes"
   ]

   resources = [
     aws_sqs_queue.movie_updates_queue.arn
   ]
 }
}
Note that if your SQS queue is encrypted with kms, you’ll need to add the kms:Decrypt permission to the policy.
Now, push the code to GitHub and wait for the workflow to succeed in creating our lambda and trigger. You can check if it worked by going to the lambda and seeing the trigger attached to it:
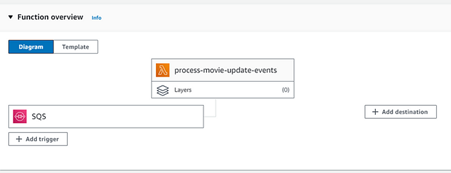
Fig. 25
Let’s code our Lambda. In the apps folder, create a new folder named process-movie-update-events and let’s initialize a Typescript project with:
npm init -y
npm i -s typescript
Inside the package.json add the tsc script:
{
 "name": "process-movie-update-events",
 "version": "1.0.0",
 "description": "",
 "main": "index.js",
 "scripts": {
   "tsc": "tsc",
   "test": "echo \"Error: no test specified\" && exit 1"
 },
 "keywords": [],
 "author": "",
 "license": "ISC",
 "dependencies": {
   "typescript": "^5.3.3"
 }
}
Now run the following command to initialize your TypeScript project:
npm run tsc -- --init --target esnext --module nodenext `
--moduleResolution nodenext --rootDir src `
--outDir build --noImplicitAny --noImplicitThis --newLine lf `
--resolveJsonModule
Create a new folder named src and a file named index.ts. In the index.ts add the following code:
import { SQSEvent, Context, SQSHandler, SQSRecord } from "aws-lambda";

export const handler: SQSHandler = async (event: SQSEvent, context: Context): Promise<void> => {
 for (const message of event.Records) {
   await processMessageAsync(message);
 }
 console.info("done");
};

async function processMessageAsync(message: SQSRecord): Promise<any> {
 try {
   console.log(`Processed ${message.messageAttributes["Type"].stringValue} message ${message.body}`);
   // TODO: Do interesting work based on the new message
   await Promise.resolve(1); //Placeholder for actual async work
 } catch (err) {
   console.error("An error occurred");
   throw err;
 }
}
This code will be triggered every time a new SQS message is added to our movie-updates-queue. We now need to enable SES and send an email through our lambda. To do so, create a new file named email.tf in the iac folder. There, add the following code:
# The email here will receive a verification email
# To set it as verified in SES
resource "aws_ses_email_identity" "email_identity" {
 email = "YOUR_EMAIL"
}

# Rules to monitor your SES email sending activity, you can create configuration sets and output them in Terraform.
# Event destinations
# IP pool managemen
resource "aws_ses_configuration_set" "configuration_set" {
 name = "movies-configuration-set"
}
Change the YOUR_EMAIL placeholder for the email you’d like to be the identity that the lambda will use as the source of the email.
If you already have a domain, you can use the aws_ses_domain_identity resource instead, but the verification steps are different. If you have already it registered in Route 53. You can use Terraform to automatically verify it for you with the aws_route53_record resource.
The configuration_set are groups of rules that you can apply to your verified identities. Once you push it to GitHub and the workflow succeeds, the email provided in the Terraform resource will receive an email from AWS with a link to verify its identity. Click on the link to verify and enable it.
Now, we can go back to our email-notification lambda and finalize our code. Create a models.ts file in the email-notification folder a and add the following code:
export type MovieCreated = {
 id: string;
 title: string;
 rating: number;
 genres: string[];
};

export type MovieDeleted = {
 id: string;
};

export type MovieUpdated = {
 id: string;
 title: string;
 rating: number;
 genres: string[];
};

export const MovieCreatedEventType = "MovieCreated";
export const MovieDeletedEventType = "MovieDeleted";
export const MovieUpdatedEventType = "MovieUpdated";
Let’s adapt our index.ts file with the SES code:
import { SQSEvent, Context, SQSHandler, SQSRecord } from "aws-lambda";
import { SESClient, SendEmailCommand } from "@aws-sdk/client-ses";
import { MovieCreated, MovieCreatedEventType, MovieDeleted, MovieDeletedEventType, MovieUpdated, MovieUpdatedEventType } from "./models.js";

export const handler: SQSHandler = async (event: SQSEvent, context: Context): Promise<void> => {
 const client = new SESClient({});
 const promises: Promise<void>[] = [];
 for (const message of event.Records) {
   promises.push(processMessageAsync(message, client));
 }

 await Promise.all(promises);

 console.info("done");
};

async function processMessageAsync(message: SQSRecord, client: SESClient): Promise<void> {
 try {
   const eventType = message.messageAttributes["Type"].stringValue ?? "MovieEvent";
   console.log(`Processing ${eventType} message ${message.body}`);

   await sendEmail(message, eventType, client);

   console.log(`Processed ${eventType} message ${message.body}`);
 } catch (err) {
   console.error("An error occurred");
   console.error(err);
 }
}

async function sendEmail(message: SQSRecord, eventType: string, client: SESClient) {
 const [subject, body] = buildSubjectAndBody(message.body, eventType);

 const sourceEmail = "YOUR_SOURCE_EMAIL"; // Ideally it needs to be validated and logged if not set
 const destinationEmail = "YOUR_DESTINATION_EMAIL"; // Ideally it needs to be validated and logged if not set

 const command = new SendEmailCommand({
   Source: sourceEmail,
   Destination: {
     ToAddresses: [destinationEmail],
   },
   Message: {
     Body: {
       Text: {
         Charset: "UTF-8",
         Data: body,
       },
     },
     Subject: {
       Charset: "UTF-8",
       Data: subject,
     },
   },
 });

 await client.send(command);
}

function buildSubjectAndBody(messageBody: string, eventType: string): [string, string] {
 let subject = "";
 let body = "";
 const messageJsonBody = JSON.parse(messageBody);
 switch (eventType) {
   case MovieCreatedEventType:
     const movieCreatedEvent = <MovieCreated>messageJsonBody;

     subject = "New Movie Added: " + movieCreatedEvent.title;
     body = "A new movie was added!\n" +
       "ID: " + movieCreatedEvent.id + "\n" +
       "Title: " + movieCreatedEvent.title + "\n" +
       "Rating: " + movieCreatedEvent.rating + "\n" +
       "Genres: " + movieCreatedEvent.genres;

     break;

   case MovieDeletedEventType:
     const movieDeletedEvent = <MovieDeleted>messageJsonBody;

     subject = "Movie Deleted. ID: " + movieDeletedEvent.id;
     body = "A movie was updated!\n" +
       "ID: " + movieDeletedEvent.id;

     break;

   case MovieUpdatedEventType:
     const movieUpdatedEvent = <MovieUpdated>messageJsonBody;

     subject = "Movie Updated: " + movieUpdatedEvent.title;
     body = "A movie was updated!\n" +
       "ID: " + movieUpdatedEvent.id + "\n" +
       "Title: " + movieUpdatedEvent.title + "\n" +
       "Rating: " + movieUpdatedEvent.rating + "\n" +
       "Genres: " + movieUpdatedEvent.genres;

     break;

   default:
     throw new Error("An unknown movie event was received");
 }

 return [subject, body];
}
Don’t forget to change YOUR_SOURCE_EMAIL to the email set in SES, and YOUR_DESTINATION_EMAIL to the email you’d like to receive these event messages. We are just left to add a workflow to deploy this lambda. So, let’s add a deploy-email-notification-lambda.yml file in the .github/workflows folder and add the following code to build and deploy your lambda:
name: Deploy Email Notification Lambda
on:
 push:
   branches:
     - main
   paths:
     - apps/email-notification/**/*
     - .github/workflows/deploy-email-notification-lambda.yml

defaults:
 run:
   working-directory: apps/email-notification/

jobs:
 terraform:
   name: "Deploy Email Notification Lambda"
   runs-on: ubuntu-latest
   steps:
     # Checkout the repository to the GitHub Actions runner
     - name: Checkout
       uses: actions/checkout@v3

     - name: Setup NodeJS
       uses: actions/setup-node@v4
       with:
         node-version: 20

     - name: Configure AWS Credentials Action For GitHub Actions
       uses: aws-actions/configure-aws-credentials@v1
       with:
         aws-access-key-id: ${{ secrets.AWS_ACCESS_KEY }}
         aws-secret-access-key: ${{ secrets.AWS_SECRET_ACCESS_KEY }}
         aws-region: eu-central-1

     - name: Install packages
       run: npm install

     - name: Build
       run: npm run build

     - name: Zip build
       run: zip -r -j main.zip ./build

     - name: Update Lambda code
       run: aws lambda update-function-code --function-name=email-notification --zip-file=fileb://main.zip
Amazing! Now, push your code to GitHub and wait for your lambda deployment. You can create, update, and delete a movie to test it. An email should be received in the destination email with the body and subject set by you in the lambda.
Conclusion
This journey provided a practical guide to constructing serverless APIs and highlighted the simplicity and scalability achieved by combining AWS services and infrastructure as code (IAC) with Terraform.
We’ve successfully built a serverless CRUD API with NodeJS and Go on AWS using Terraform. We started by setting up the foundational components, including an API Gateway, Lambda functions, and a DynamoDB table.
The flexibility of AWS Lambda allowed us to showcase the ease of working with different programming languages, demonstrating implementations in both Go and TypeScript. Each Lambda function was equipped with the necessary permissions to interact with the DynamoDB table, showcasing the power of AWS Identity and Access Management (IAM) for secure resource access.
Additionally, we automated the deployment process using GitHub Actions, ensuring a seamless integration of code changes into the AWS environment. By following these steps, readers can replicate and extend the project, gaining insights into building robust serverless APIs with diverse language support.
Not only that, but you could also learn how to set up and send messages to SNS and SQS with a fanout pattern to trigger other lambdas.
And last, we’ve also managed to use SES (Simple Email Service) to send emails by triggering a lambda through a SQS event.
I hope you enjoyed this article as much as I enjoyed writing it! The code for this project can be found here.
Happy coding! 💻
Frequently Asked Questions
What AWS services are used in this serverless CRUD API project?
This project uses AWS API Gateway, Lambda (Node.js, Go, TypeScript), DynamoDB, SNS, SQS, SES, and S3 for remote Terraform state storage, orchestrated using Terraform and deployed via GitHub Actions.
Why use Terraform and GitHub Actions for serverless deployment?
Terraform defines and manages infrastructure as code, giving consistency and modifiability. GitHub Actions automates continuous deployment—both infrastructure and lambda code are applied on push to main, enabling scalable and maintainable workflows.
How is the “get movie by ID” Lambda structured?
A Terraform module creates the Node.js 20.x Lambda function with IAM role, policy for DynamoDB access, and API Gateway GET method integration. The Lambda fetches a DynamoDB item by the provided movieID and returns a structured JSON response.
How are API Gateway methods modularized?
A Terraform module (rest‑api‑method) handles creation of API methods, Lambda proxy integrations, and permissions. Modules are reused for GET, POST, PUT, DELETE endpoints under /movies and /movies/{movieID}.
How does the blog implement CRUD operations in serverless?
- GET fetches a movie by ID (Node.js).
- POST creates a movie (Go).
- DELETE deletes a movie (TypeScript).
- PUT updates a movie (Go).
Each Lambda is integrated via API Gateway to DynamoDB backend and deployed with GitHub Actions.
How are cross-service events handled for notifications?
- Lambdas publish events to SNS whenever a movie is created, updated, or deleted.
- SNS fans out to an SQS queue.
- A Node.js Lambda processes messages from SQS and sends emails via SES for event notifications.
How are Lambda functions deployed and updated?
Each Lambda has a dedicated GitHub Actions workflow. Node.js lambdas zip and update code; Go lambdas are built for Linux and deployed similarly. Infrastructure changes trigger Terraform workflows on iac folder updates.
How can I avoid unexpected AWS billing during this experiment?
All used services fall under the AWS free tier or have minimal cost. To be safe, set an AWS budget (e.g., $0.01) to receive alerts if usage incurs charges.