
Azure Cloud Functions are ideal whenever the programme task they represent is initiated by a trigger. In this article, we take a closer look at these functions.
To understand the role of Azure Cloud Functions, let’s first look at the structure in Figure 1.
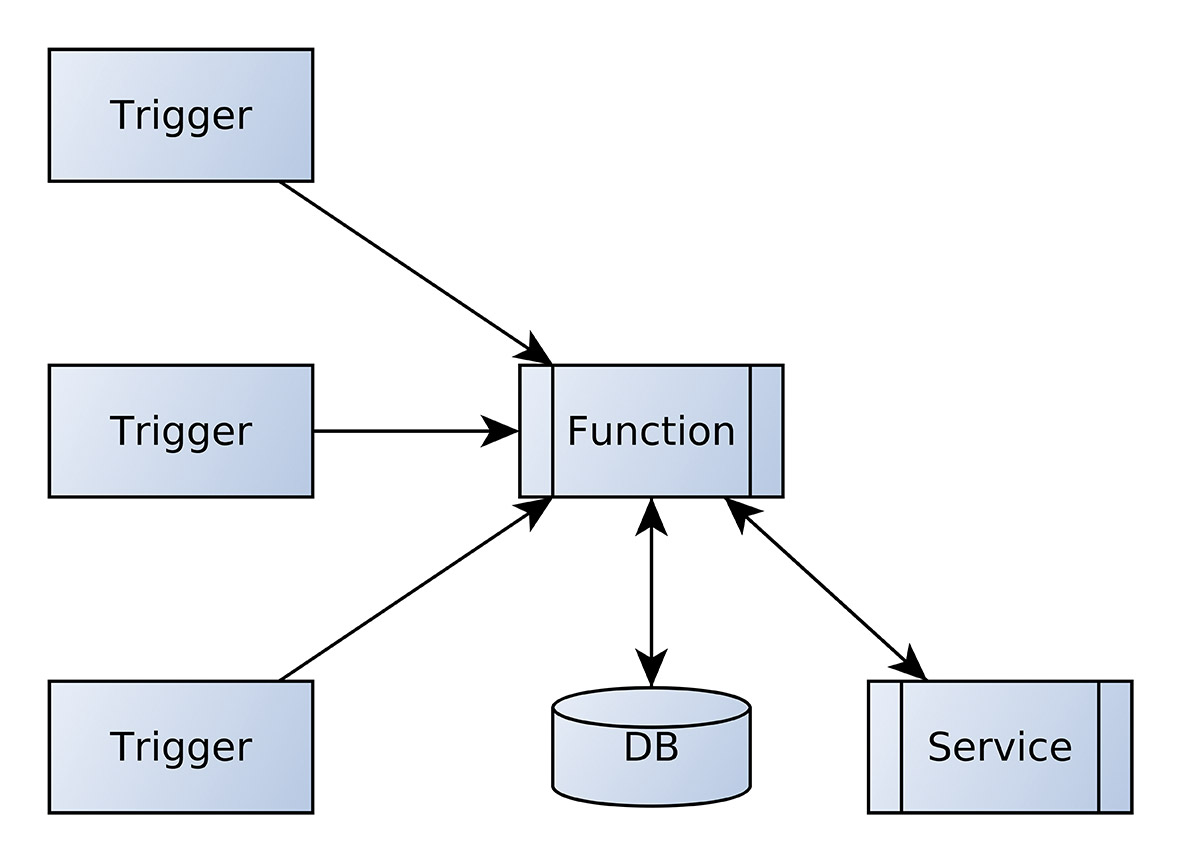
Fig. 1: The Azure Function is called by a trigger
The storage of the calculation operations triggered in response to the event is usually done using the various persistence options provided by Azure. In theory, it would of course also be possible to call an external service via REST, for example, and to persist there via side effects.
-
Platform independence
Microsoft holds back in the area of languages that can be used to realise the payload. By default, Redmond supports Java and various .NET languages. However, via the custom handler described in detail in [1], there is also an interface that enables motivated developers to integrate other programming languages.
In the following steps, however, we want to focus on Java. We have various options for the development environment: In the area of full-fledged IDEs, Microsoft Visual Studio Code, Eclipse and IntelliJ IDEA are supported equally. Those who want to work on the command line can do so using the Maven build system as well as Gradle, which is particularly popular with Android developers.
In the following steps, the author will use his familiar eight-core workstation running under Ubuntu 20.04 LTS. Eclipse for Java Developers version 2022-09 is used as the IDE. However, the procedure demonstrated here also works analogously with other IDEs and platforms; there are only differences in the tooling, but not in the area of the actual coding.
In the first step, we need to download some Azure-specific components. First, we need the Azure CLI – a command-line utility that fires various REST APIs against the Microsoft backend in an automated way. Users of Ubuntu Linux have to be careful at this point, as the distribution itself comes with a version of the CLI. However, this is almost always out of date: Microsoft explicitly warns against its use in the documentation (Fig. 2).
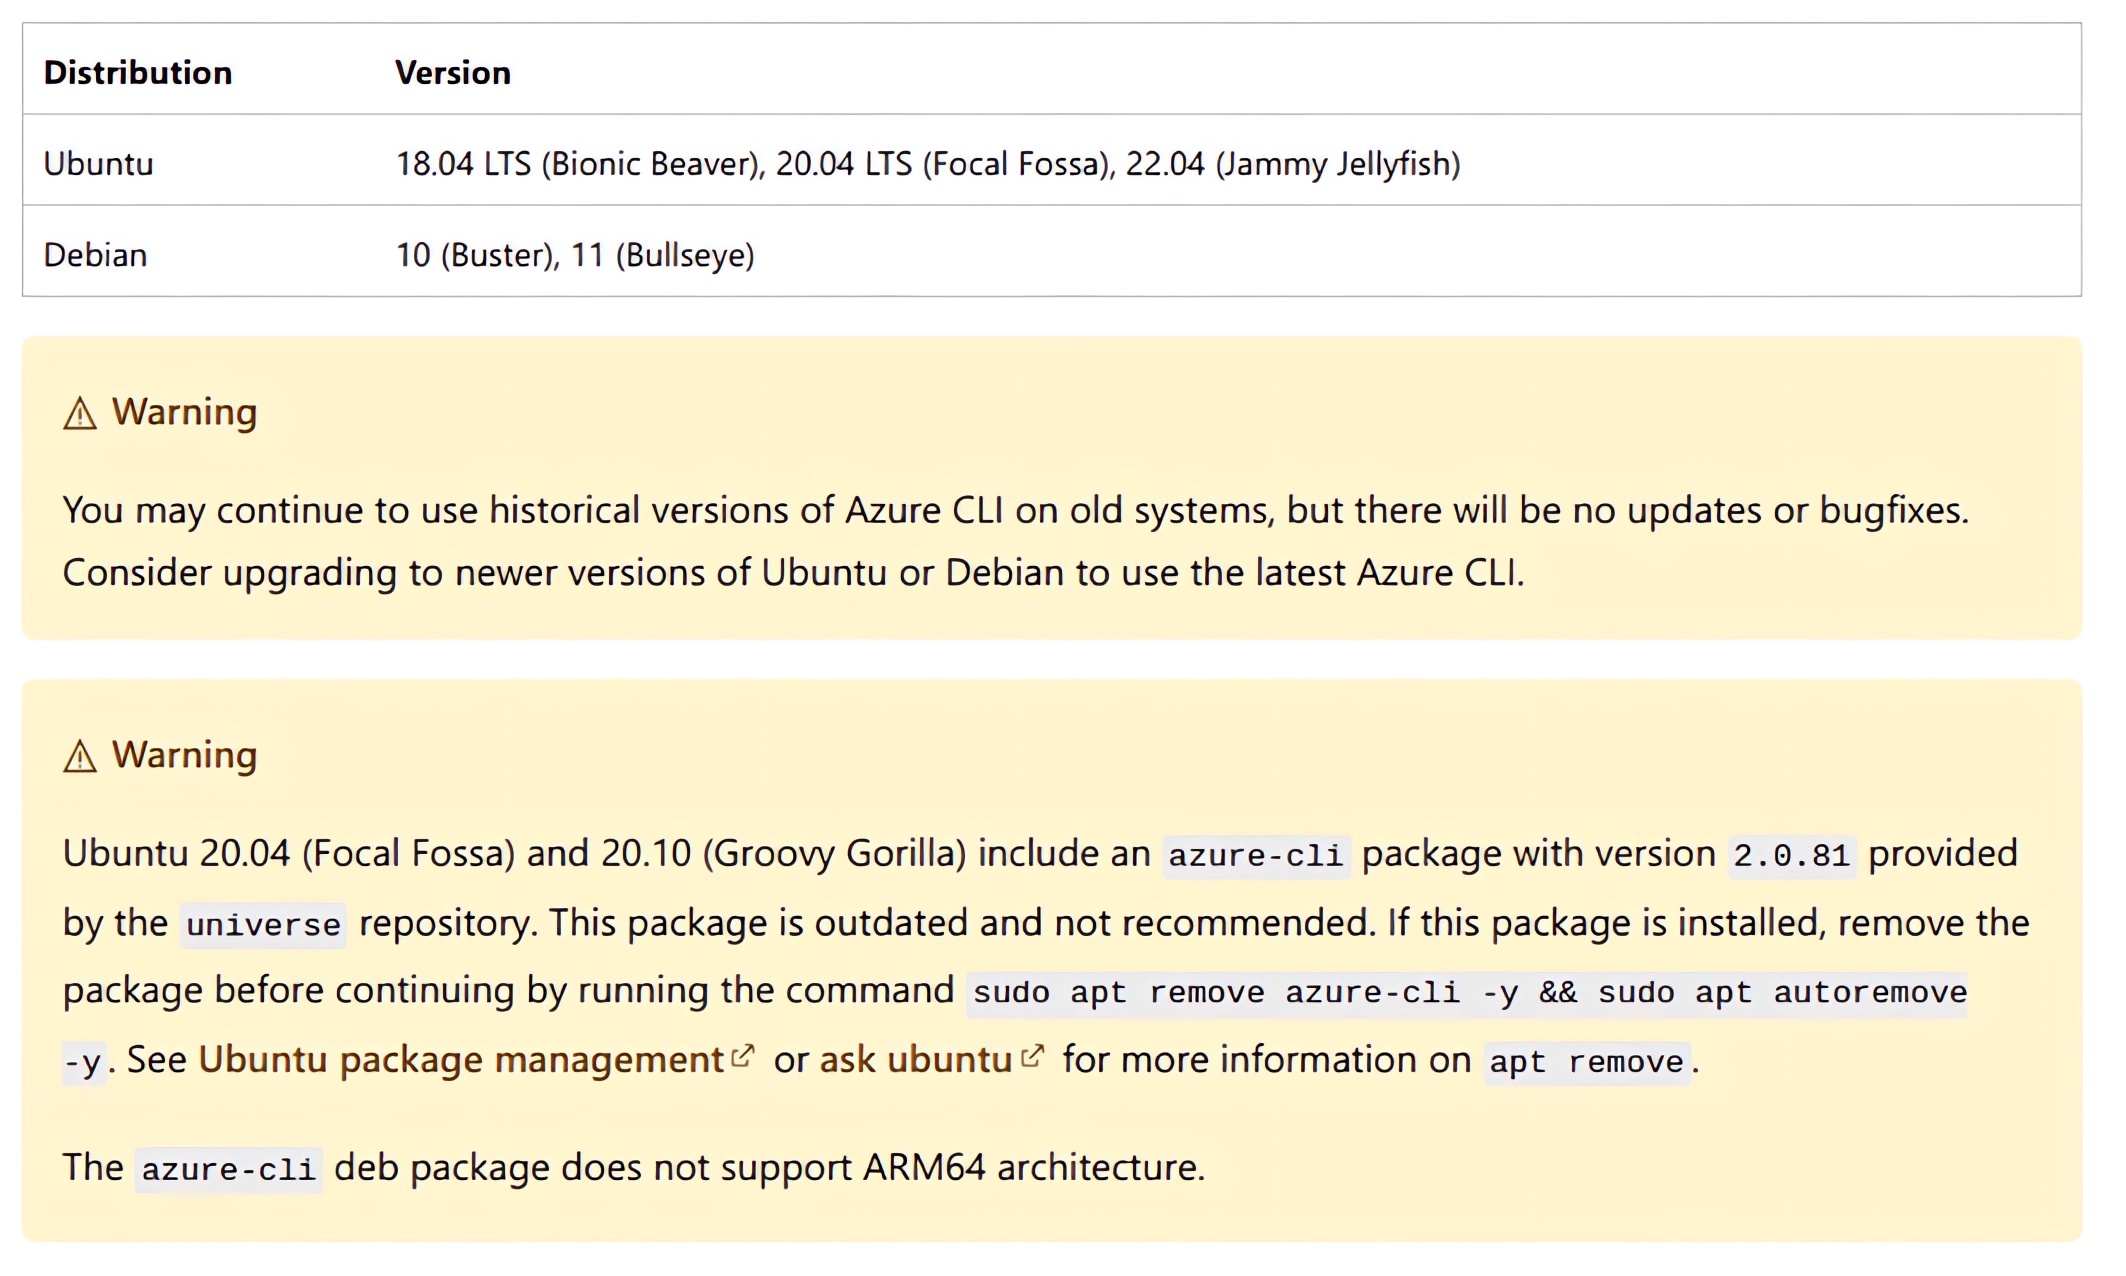
Fig. 2: Microsoft warns: The Ubuntu package managers sometimes work at a slow pace (Image source: Microsoft)
As a first task, therefore, we want to order the removal of any existing installation of the CLI according to the following scheme:
tamhan@TAMHAN18:~$ sudo apt remove azure-cli -y && sudo
apt autoremove -y
[sudo] password for tamhan:
For the actual installation, Microsoft offers several options – in addition to manually gathering the necessary components, there is also a script that can be downloaded via curl, which should perform all tasks automatically. In the following steps, we will rely on the automatic script, which can be released for execution according to the following code:
tamhan@TAMHAN18:~$ curl -sL
https://aka.ms/InstallAzureCLIDeb | sudo bash
. . .
Note that the Azure CLI often includes various add-on packages – on the author’s workstation it occupies some 100 MB of remanent memory. Therefore, downloading the packages may take some time. The only important thing is that the installation is acknowledged with the success message “Setting up azure-cli (2.44.0-1~focal)” after the work is done.
In the next step, we have to authenticate the installation or the workstation with the Azure backends. This is done by using the command az login, which can be entered in any terminal window:
tamhan@TAMHAN18:~$ az login
Since the actual login takes place in the standard browser of the workstation, it is recommended to visit the Azure Portal and log in there before entering [2]. After typing az login, another browser window appears in which you nod off the login – the result is displayed as in Figure 3.
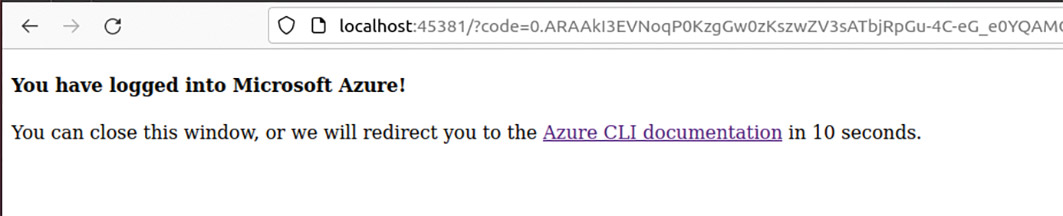
Fig. 3: The connection between CLI and backend is successful
If you use an Azure instance provided by a company or another source to perform the following experiments, you may have to log in differently. Microsoft defines all possible credential combinations under [3], the only important thing for the following steps is that the instance is authorised to communicate with the Azure backend.
Theoretically, we can start installing the emulator at this point, which enables local execution of the code and saves both costs and latency when debugging. Since the Azure Functions Runtime is now available in four different versions, we want to start building the project skeleton first.
STAY TUNED!
Learn more about Serverless Architecture Conference
Maven as a source for functions projects
The decision for Eclipse usually also entails a decision for the build system Maven. For the following steps, we want to rely on the archetype that can be viewed under [4] in the Maven portal, which implements an ordinary project that can be addressed via HTTP. In the first step, we have to open the project generator, which is available under File | New | Maven Project.
In the archetype search window, we then search for the string azure-functions-archetype, which can be found in the group ID Com.Microsoft.Azure. Note that you need to think along in the window shown in Figure 4 – this part of the project generator allows you to set some constants that, if selected incorrectly, will cause problems when executing or uploading the generated Azure Function to the backend.
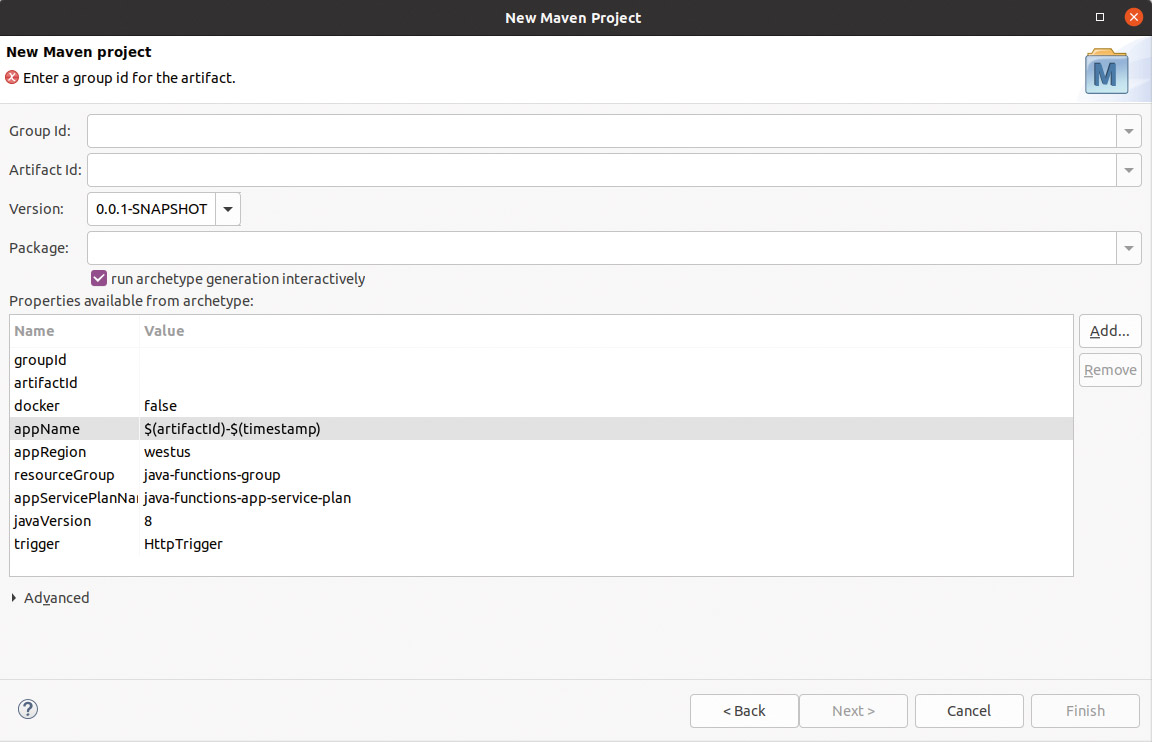
Fig. 4: When this form is visible, the developer has to think along
Firstly, the value entered in appRegion, which describes the geographical location of the function, is important here. If you want to use a new resource group, you can instruct this under resourceGroup. Also of interest is the string created in appName, which is $(artifactId)-$(timestamp). The names of the function containers should be unique worldwide. Since the Eclipse project generator uses the values as part of the generation, you should have no problems with fulfilling this condition when using the given string.
The groupid and artefactid fields still require manual intervention because Eclipse does not populate the values in the properties field with the values entered in the text box above. In any case, after successfully filling in the fields, we can click on Finish to trigger the deployment and assembly of our project skeleton. Don’t be surprised if you see some component downloads in the console, it takes Maven some time to deploy.
In some cases, the string Y: : will appear in the project generator window – then click in the console window and press Enter to confirm the point. Now the generation of the project skeleton should run through (Fig. 5).
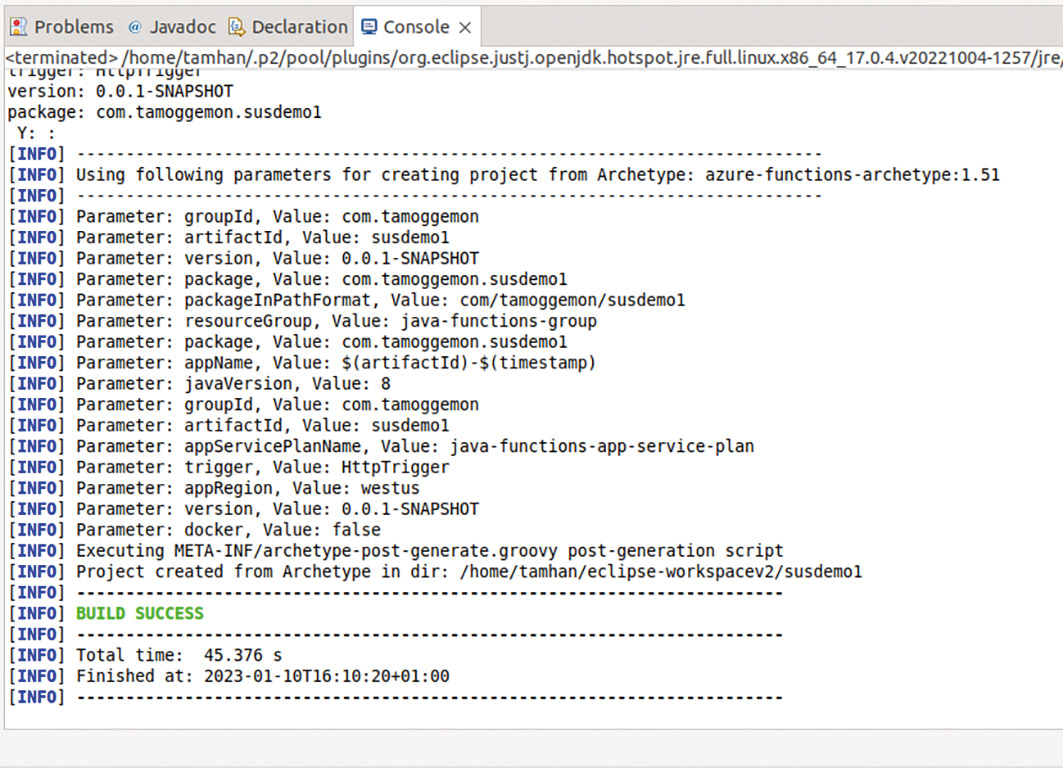
Fig. 5: If the string Y: : appears, you must confirm
After the work is done, the first step should be to open the pom file in which we are informed about the version of the Functions Runtime expected by the project skeleton according to the following scheme:
<properties>
  . . .
  <azure.functions.java.library.version>2.2.0</azure.functions.java.library.version>
The string part 2.2.0 informs us that our project skeleton intends to use the second version of the Azure Functions Runtime.
In the subpackage /src/main/java we then find the actual Java code that implements the mirroring of the delivered request. The actual method is created as a kind of POJO; it is important to first use the @FunctionName(“HttpExample”) attribute, which marks a specific function as addressable or relevant for the runtime (Listing 1).
Listing 1
public class Function {
  @FunctionName("HttpExample")
  public HttpResponseMessage run(
    @HttpTrigger(
    name = "req",
    methods = {HttpMethod.GET, HttpMethod.POST},
    authLevel = AuthorizationLevel.ANONYMOUS)
    HttpRequestMessage<Optional<String>> request,
    final ExecutionContext context) {
In the parameter of the run method, there is another annotation that specifies which type of HTTP request is allowed or recommended for the activation of this function.
In the actual Java code, we then continue in a straightforward way, outputting information about the execution context in the first step, and then requesting or receiving some parameters from the runtime:
context.getLogger().info(“Java HTTP trigger processed a request.”);
final String query = request.getQueryParameters().get(“name”);
final String name = request.getBody().orElse(query);
The rest of the code then uses the supplied request object or the builder class createResponseBuilder contained in it to construct a message to be returned to the caller (Listing 2).
Listing 2
   if (name == null) {
      return request.createResponseBuilder(HttpStatus.BAD_REQUEST).body("Please pass a name on the query string or in the request body").build();
    } else {
      return request.createResponseBuilder(HttpStatus.OK).body("Hello, " + name).build();
    }
  }
}
Basically, you can do whatever you want within your function – it is an ordinary Java Runtime. The most important thing here is the limitation of the execution time, which varies depending on the plan.
For execution, we now need the emulator mentioned above. The main problem is that only one of the four versions may be installed on each workstation. If you want to support several versions of the Functions Runtime, you either have to buy several computers or fall back on virtual machines.
In the next step, we must again grab a terminal window in which we enter the three commands from Listing 3.
Listing 3
tamhan@TAMHAN18:~$ curl https://packages.microsoft.com/keys/microsoft.asc | gpg --dearmor > microsoft.gpg
tamhan@TAMHAN18:~$ sudo mv microsoft.gpg /etc/apt/trusted.gpg.d/microsoft.gpg
tamhan@TAMHAN18:~$ sudo sh -c 'echo "deb [arch=amd64] https://packages.microsoft.com/repos/microsoft-ubuntu-$(lsb_release -cs)-prod $(lsb_release -cs) main" > /etc/apt/sources.list.d/dotnetdev.list'
In addition to downloading and arming the PGP key intended for verifying the downloaded software packages, we also update the contents of the package list here to enable apt and apt-get respectively to locate the requested compilations.
The actual installation is then done by manually updating the package sources and downloading the package, which is identified as the second version by its prefix:
tamhan@TAMHAN18:~$ sudo apt-get update
tamhan@TAMHAN18:~$ sudo apt-get install azure-functions-core-tools-2

Note that the azure-functions-core-tools-2 package is not small either - on the author's workstation it allowed itself a good 170 MB of remanent memory.
For the actual start-up, we then have to create two run configurations. First, we right-click on the project in the Project Explorer and choose the option Run As | Maven build in the context menu. Be careful not to accidentally select Maven build ... by mistake. In the launch configuration editor that now appears, we decide on the Goals field by entering the string package. After commanding a compilation process or executing the newly created build configuration, you will see the message “[[1;34mINFO[m] Successfully built Azure Functions” in the console, informing you about the successful packaging.
In the next step, we open the list of run configurations and duplicate the configuration that was just created automatically to take over the project-specific properties. However, in the Goals field we now enter the command azure-functions:run -DenableDebug to theoretically start the emulator we just downloaded. What happens in the next step depends on your configuration: If you install your Eclipse with the installer, you will normally get error messages of the type “Failed to start Worker Channel. Process fileName: %JAVA_HOME%/bin/java.” These indicate that the variable JAVA_HOME is not set. Since the emulator system requires this to localise the runtime, it only starts partially and is not capable of accepting requests.
In this context, it is helpful to take a careful look at the header of the console tab, which provides information about the location of the JVM supplied by Eclipse (Fig. 6).

Fig. 6: Eclipse facilitates the search for the JVM
In the case of the author’s configuration, the correct string would be, for example, /home/tamhan/.p2/pool/plugins/org.eclipse.justj.openjdk.hotspot.jre.full.linux.x86_64_17.0.4.v20221004-1257/jre.
Although adjusting the environment variable complements is not an earth-shattering task, it does mean an intervention in the system configuration that one would not necessarily want to carry out. It is only critical in that the Eclipse IDE is normally started from the Start menu, and the Linux desktop assigns the default complement of environment variables.
To solve the problem, you have to navigate to the folder containing Eclipse in the first step according to the following scheme and create the new environment variable by exporting it before the start via ./eclipse:
tamhan@TAMHAN18:~/eclipse/java-2022-09/eclipse$ export JAVA_HOME=/home/tamhan/.p2/pool/plugins/org.eclipse.justj.openjdk.hotspot.jre.full.linux.x86_64_17.0.4.v20221004-1257/jre
tamhan@TAMHAN18:~/eclipse/java-2022-09/eclipse$ ./eclipse
After restarting the IDE, launch the configuration again, which will now start up without error messages. The result can then be seen in a web browser of your choice as shown in figure 7.
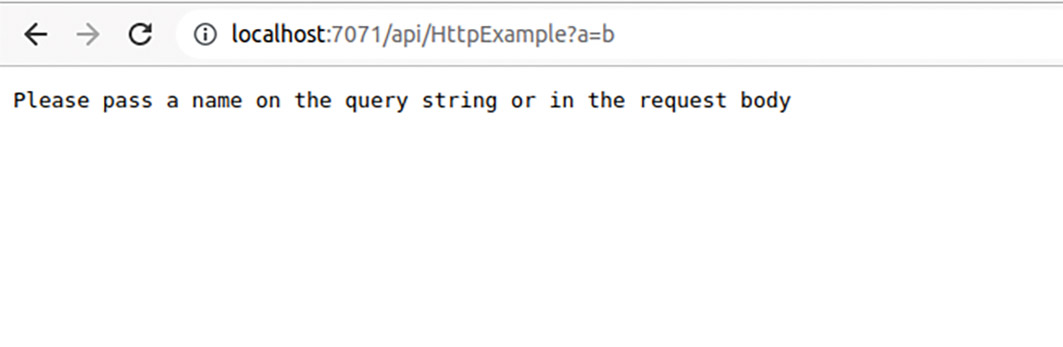
Fig. 7: The function complains about the invalid input values
It is also important that only one instance of the emulator is allowed to run on the workstation at a time. So make sure to stop it. Fortunately, this can be done in Eclipse by clicking on the red stop symbol in the console tab.
In this context, it is also interesting to be able to initiate a debugging run via the option Run | Debug Configurations | Remote Java Application. The emulator normally provides a debugger port in the background, the location of which is informed in detail by the status message issued during the start and structured according to the scheme “Listening for transport dt_socket at address: 5005”.
If you want to upload the function to the Azure backend, you need another Maven configuration. However, the value azure-functions:deploy is now entered as a Goal, which informs the Maven infrastructure about the necessity of establishing a connection to the cloud. The most important thing about this command is that you must log in beforehand using az login – if you do not perform the log-in process carried out above, the Azure backend will reject the commands sent by Maven without comment.
Especially the first run of this command takes a lot of time because the Eclipse tool has to generate some support infrastructure that the Azure Cloud Function needs later to ensure its viability (Fig. 8).
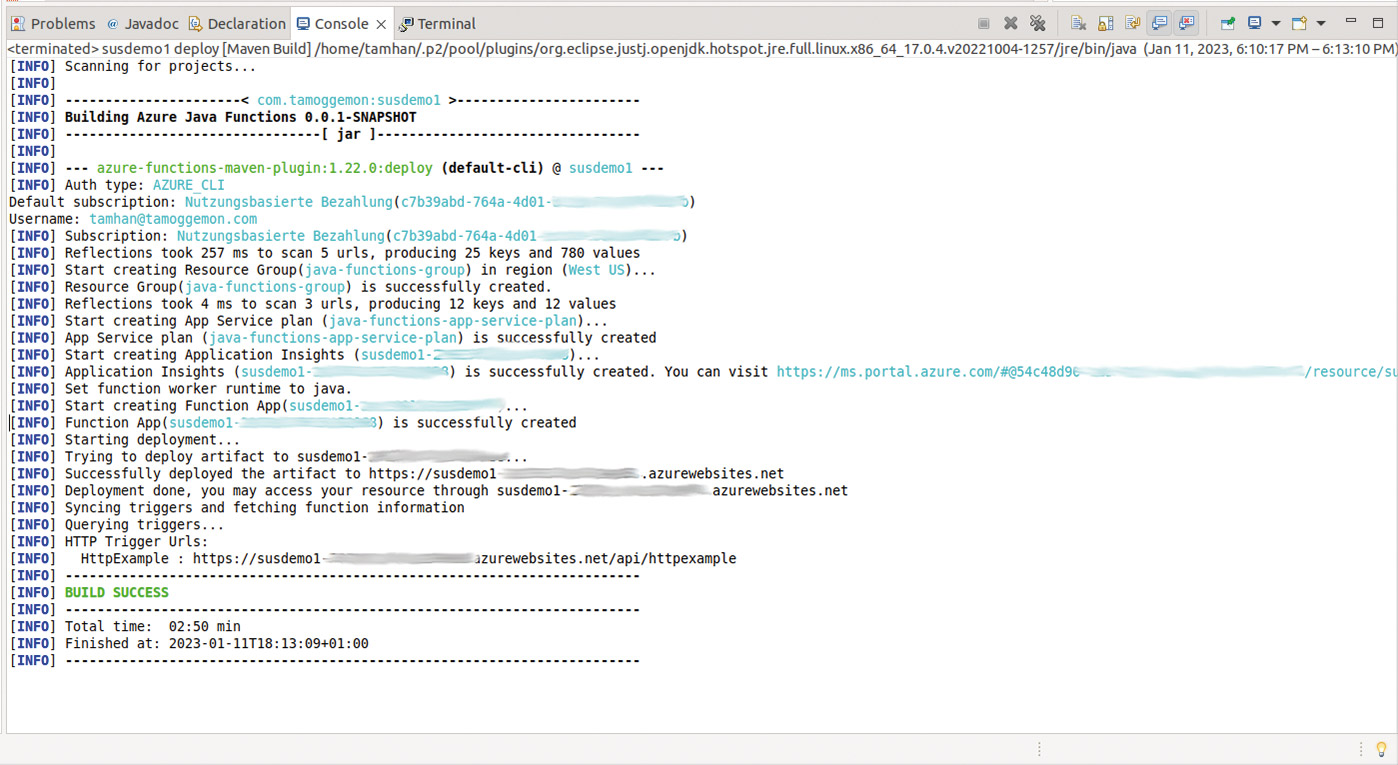
Fig. 8: Initial deployment of a cloud function is labour-intensive
The most important thing here is that the system informs you after the work is done about the output of the HTTP trigger URL, via which you can activate our Cloud Function directly later.
Architecture and additional functions
Our function can be quite useful in practice; Microsoft documents an example workflow in the architecture reference list available at [5], as shown in Figure 9. What is striking here is that the GitHub Actions trigger an Azure Function, which then handles the advanced processing of the event that has occurred for the developer.
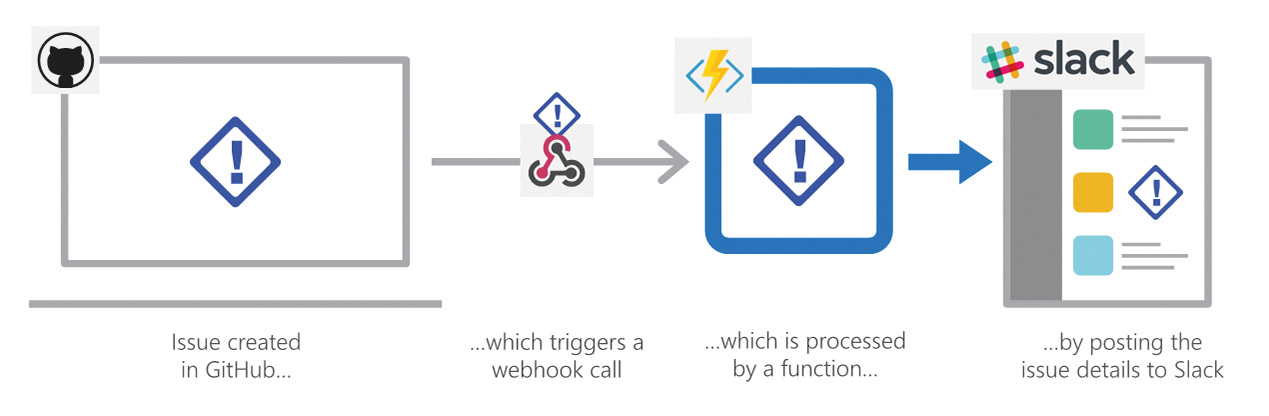
Fig. 9: Azure Functions can be triggered from GitHub Actions. (Image source: [5]).
Another and at least equally interesting architecture is the time-controlled analysis or evaluation of data. Microsoft also illustrates this with an example that periodically queries an event log in order to transfer only the deduplicated events into a complex computing process (Fig. 10).
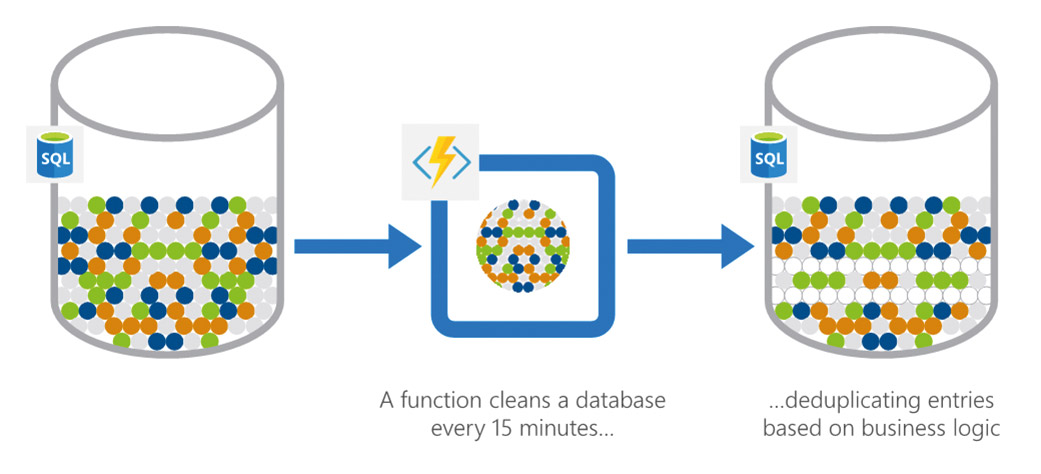
Fig. 10: The Azure Cloud Function saves computing time by eliminating duplicates (image source: [5]).
The main problem with this task is that Microsoft brings the comparatively extensive intelligence needed to create a new package to your computer in the Maven artefact azure-functions:add. This is disadvantageous in that it runs fully interactively and is not functional when started directly via Eclipse’s run as function.
The situation is made particularly complicated by the fact that the Eclipse IDE comes with a special variant of package management called Embedded Maven. This is also a special case in that it can realistically only be called from within the Eclipse IDE, and is not suitable for running standalone targets that want to live on the command line.
As a particular annoyance, downloading Maven from the package source distribution according to the scheme below would provide a completely outdated version that fails the following steps with an error related to the Google plug-in. This is not viable because there is a conflict with the JVM in the background:
tamhan@TAMHAN18:~$ sudo apt-get install maven
. . .
tamhan@TAMHAN18:~$ mvn -v
Apache Maven 3.6.3
The only way to solve the problem is to visit [6], where you can download a binary file – currently version 3.8.7 – and extract it to a conveniently accessible location in the file system. After that, you need a shell with Java Home set, where you can do a dry run of the administration according to the following scheme:
tamhan@TAMHAN18:~/apache-maven-3.8.7/bin$ ./mvn -v
Apache Maven 3.8.7 (b89d5959fcde851dcb1c8946a785a163f14e1e29)
In the next step, the target can be executed in this way:
tamhan@TAMHAN18:~/eclipse-workspacev2/susdemo1$ ~/apache-maven-3.8.7/bin/mvn azure-functions:add

[INFO] Scanning for projects...
In the second step, the system offers a list of all triggers that the current version of the Functions Runtime provides (Fig. 11).
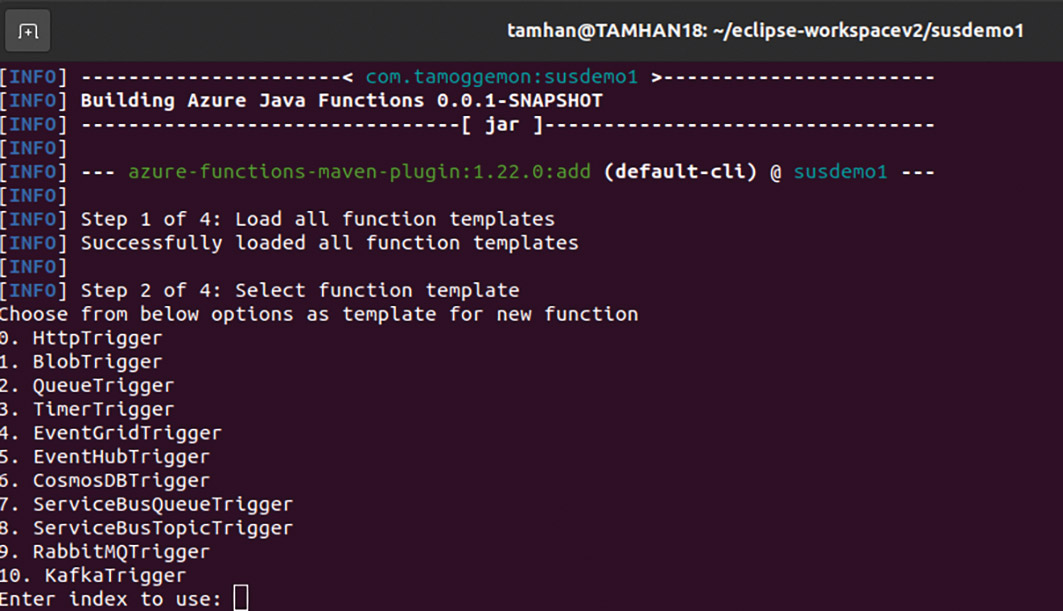
Fig. 11: Maven asks to choose the appropriate project type

Develop state-of-the-art serverless applications?
Explore the Serverless Development Track
In the following steps, we decide on the TimerTrigger option, which is currently done by entering 3 and pressing the ENTER key. In the third step, the product then asks, among other things, for the name of the class to be used and the package – make sure here to enter those values that you have used everywhere in the Eclipse project.
The last step, which asks for the activation plan, is critical. In the background, Microsoft only uses Cron at first glance, which is why the output structured according to the following scheme is confusing:
[INFO] Trigger specific parameter [schedule]: Enter a cron expression of the format ‘{second} {minute} {hour} {day} {month} {day of week}’ to specify the schedule
As a cron parser, Microsoft relies on the NCRONTAB variant described in detail in [7], which differs slightly in the area of parser syntax.
For our first attempts, the author would like to suggest a trade-off between the frequency of activating the function and the amount of Azure costs incurred. Note that each execution of the Azure Cloud Function consumes computing power, which Microsoft will charge you for. A grateful string is therefore 0 */5 * * *, which you enter into the command line tool in the following way:
Enter value for schedule(Default: 0 * * * * *): 0 */5 * * * *
The reward for the effort is the creation of a new .java file, which the Eclipse Package Explorer sometimes does not notice immediately. In this case, it is advisable to open the context menu and use the Refresh option to update or compare the state in Eclipse with the contents in the file system.
After the new file is visible, we notice that it has the contents from Listing 4.
Listing 4
public class TimedFunction {
  @FunctionName("TimedFunction")
  public void run(
    @TimerTrigger(name = "timerInfo", schedule = "0 */5 * * * *") String timerInfo,
    final ExecutionContext context
  ) {
    context.getLogger().info("Java Timer trigger function executed at: " + LocalDateTime.now());
  }
}
You will find two annotations here: firstly, the annotation @FunctionName(“TimedFunction”), which is responsible for the location, and secondly, @TimerTrigger(name = “timerInfo”, schedule = “0 */5 * * *”), which is responsible for setting the execution state and takes the cron string entered above as a parameter. The actual corpus currently consists only of a call to the logger, which emits logging information when activated.
At this point, we are basically ready to execute our Cloud Function: a task we will address in the next part of this article series.
Conclusion
Our experiments have shown that Azure Functions enable the execution of Java code independently of a manually provided JVM and co. As a next step, we could now upload our timer function to get it running and evaluate it with the various analysis tools available in the backend. Note that the elements created with the command line tool live on in the backend – you should delete them to avoid permanently incurring further costs.